BMW K bikes (Bricks)


You are not connected. Please login or register

View previous topic View next topic Go down  Message [Page 1 of 1]


Guest

avatar
Guest
Hi all,

Before I go yanking this beast apart, in a attempt to FINALLY get this buggered running, can you give a deep scratch of the collective noggin, and let me know your best secrets for getting the drive line apart, then removing and replacing the GPS (Gear Position Sensor) please?

Cheers, Alex.

P.S, I'm bracing myself for this being a pig of a job, but know I can't sleep until this machine comes alive again.


charlie99

charlie99
VIP
VIP
no need to pull it all apart
just drain the transmission fluid
take off the rear wheel whilst mounted sitting on the centre stand
then access is a breeze from underneath

clean the area around the switch assembly with degreaser before you do anything using a cloth to clean away debris

but perhaps if you undo the clutch cable (taking care not to let the return spring rip the seal boot off the clutch arm or tear a hole in it  (undo the retaining pipe clip first )  you could remove the clutch arm pivot rod  and then the clutch arm ...allowing even more access

the rubber plug that passes through the gearbox for the cabling is easily removed and returned

treat the seal area of the switch with paint type  oil- grease remover ... alcohol or some such on the gearbox mount points . and possibly retap the 4 mm threads of the mounting bolts ( as they usually are stuck in there and corroded heads )   new bolts .(use allen head types . not phillips head )

then mount the switch   test the operation so that it proves to be correct  
then remove the switch from the gear box


just  smear of sealant around the mating surfaces before tightening the switch assembly to the gearbox might be a sensible idea , as I don't know if you got as seal with the sensor ..

use copper slip of something on the threads as they go in .

reassemble as taken apart


__________________________________________________
cheezy grin whilst riding, kinda bloke ....oh the joy !!!! ...... ( brick aviator )

'86 K100 RT..#0090401 ..."Gerty" ( Gertrude Von Clickandshift ) --------O%O
'86 k100 rs.. #######..  "Fred " (f(rame) red ) ( Fredrick leichtundschnell ) - -
bits and pieces from many kind friends across the k100 world ...with many thanks ..
1987 k100rs ########   "Red"  - (red sports rs TWB style )
1989 K100rt #009637   "Black Betty"  (naked rt ala Nigel , now sporting an rs main fairing )
    

Rick G

Rick G
admin
admin
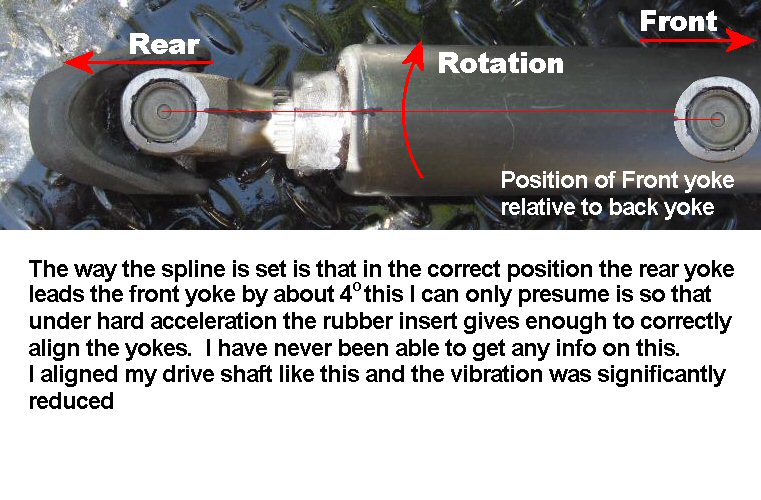
I have never figured an easy way. I did once try to just remove the swing arm pivots but pulled the thing back too far and the drive shaft parted so I had to do it the hard way after all. That is when I found out about drive shaft phasing.
K1100LT Gear Position Sensor (GPS) replacement Drive_10


__________________________________________________
"Man sacrifices his health in order to make money.
Then he sacrifices money to recuperate his health.
And then he is so anxious about the future that he does not enjoy the present; the result being that he does not live in the present or the future; he lives as if he is never going to die, and then dies having never really lived."   Dalai Lama


Bikes 1999 K1100 LT with a Big Block 1200
    

charlie99

charlie99
VIP
VIP
yeah your right rick, the swing arm is mighty big obstacle in the way

one can hope that the screws holding the switch come out easy ...or its nothing for it but to pull the gearbox aft  whole rear end off

just happen to be looking at a gearbox ...sans swingarm right now and its so easy once that thing is out of the way


__________________________________________________
cheezy grin whilst riding, kinda bloke ....oh the joy !!!! ...... ( brick aviator )

'86 K100 RT..#0090401 ..."Gerty" ( Gertrude Von Clickandshift ) --------O%O
'86 k100 rs.. #######..  "Fred " (f(rame) red ) ( Fredrick leichtundschnell ) - -
bits and pieces from many kind friends across the k100 world ...with many thanks ..
1987 k100rs ########   "Red"  - (red sports rs TWB style )
1989 K100rt #009637   "Black Betty"  (naked rt ala Nigel , now sporting an rs main fairing )
    

robmack

robmack
Life time member
Life time member
Same here, Charlie.  I've not found an easy way to access the TGPI switch mounting bolts except to remove the swingarm.  They have tiny recesses 7mm heads that makes it difficult to get a socket in that area to unscrew them while the swingarm is in the way.

I agree with your advice to coat the switch housing in waterproofing such as silicone sealant or truck bed liner after servicing the switch but before refitting it. That process keeps water / debris out and extends the service life of the switch.


__________________________________________________
Robert
1987 K75 @k75retro.blogspot.ca
http://k75retro.blogspot.ca/
    

Dai

Dai
Life time member
Life time member
You might want to find/repair a spare one first. The rubber cover will have perished badly and will split when you try to take it off. When I did my last one I used self-amalgamating tape to effectively make a rubber cover over the rubber cover and around thirty thousand miles later it's still okay. Get plenty of penetrating fluid around the two small bolts as I have seen the heads break off. That's one repair I haven't yet figured out; it's probably going to be a lots-of-heat job eventually.

As Charlie says, remount the bugger with 4mm allen bolts. I used stainless ones with a large dollop of copperslip. Try not to knacker the threads because IIRC, there's room to tap out to 5mm but there's no room for 5mm bolt heads. The 4mm ones are hard up against the sides of the GPS body.


__________________________________________________
1983 K100 naked upgraded to K100LT spec after spending time as an RS and an RT
1987 K100RT
Others...
1978 Moto Guzzi 850-T3, 1979 Moto Guzzi 850-T3 California,1993 Moto Guzzi 1100ie California
2020 Royal Enfield Bullet 500
    

7Back to top Go down   K1100LT Gear Position Sensor (GPS) replacement Empty gear Wed Jan 31, 2018 4:54 am

qwertymoto

qwertymoto
New member
New member
charlie99 wrote:no need to pull it all apart
just drain the transmission fluid
take off the rear wheel whilst mounted sitting on the centre stand
then access is a breeze from underneath

clean the area around the switch assembly with degreaser before you do anything using a cloth to clean away debris

but perhaps if you undo the clutch cable (taking care not to let the return spring rip the seal boot off the clutch arm or tear a hole in it  (undo the retaining pipe clip first )  you could remove the clutch arm pivot rod  and then the clutch arm ...allowing even more access

the rubber plug that passes through the gearbox for the cabling is easily removed and returned

treat the seal area of the switch with paint type  oil- grease remover ... alcohol or some such on the gearbox mount points . and possibly retap the 4 mm threads of the mounting bolts ( as they usually are stuck in there and corroded heads )   new bolts .(use allen head types . not phillips head )

then mount the switch   test the operation so that it proves to be correct  
then remove the switch from the gear box


just  smear of sealant around the mating surfaces before tightening the switch assembly to the gearbox might be a sensible idea , as I don't know if you got as seal with the sensor ..

use copper slip of something on the threads as they go in .

reassemble as taken apart
 there are any video how to d it?


charlie99

charlie99
VIP
VIP
not sure ive seen one ( of the process start to end )
ill bet the germans - Europeans have done quite a few

but unfortunately don't have the skills to give you the keywords for the video you want to view for the process

perhaps inge k  has seen some thing  and could contribute ???


__________________________________________________
cheezy grin whilst riding, kinda bloke ....oh the joy !!!! ...... ( brick aviator )

'86 K100 RT..#0090401 ..."Gerty" ( Gertrude Von Clickandshift ) --------O%O
'86 k100 rs.. #######..  "Fred " (f(rame) red ) ( Fredrick leichtundschnell ) - -
bits and pieces from many kind friends across the k100 world ...with many thanks ..
1987 k100rs ########   "Red"  - (red sports rs TWB style )
1989 K100rt #009637   "Black Betty"  (naked rt ala Nigel , now sporting an rs main fairing )
    

Matthew-Brisbane

Matthew-Brisbane
Life time member
Life time member
Thanks for bring up the thread 
I will be attemping to repair mine soon 
I will be doing the same when i do the spline lube 

Never done one before


Born Again Eccentric

Born Again Eccentric
Life time member
Life time member
Alexander McCarthy wrote:P.S, I'm bracing myself for this being a pig of a job, but know I can't sleep until this machine comes alive again.
Not necessarily a complete pig of a job...all depends on if your various fasteners come off without hassle!

Not sure why Charlie says "drain the transmission"...I've done it on all 3 of my bikes without draining either gearbox or final drive, with the bike on the centre stand...but make sure that the final drive is suitably supported when it is disconnected from the swing arm to ensure that it doesn't flop over and spill oil. 

It is a rear wheel off job (but not exhaust muffler), when disconnecting the rear shock, make sure that the final drive is well supported or you may tear the seals on the swing arm, if it is allowed to drop. I seem to recall, it also needs removal of both foot peg mounts (the right hand one with all the rear brake gubbins on it can be unbolted and supported without the need to disconnect any brake lines). It is then down to removing the swing arm pivots...the left hand side is pretty easy, but the right hand one can be a total pig if  it hasn't been off for a while and/or wasn't smeared with a little grease when it was last off (nominally held in place with 3 bolts...but often held in place with an unhealthy dose of aluminium oxide which can stick it fast)
K1100LT Gear Position Sensor (GPS) replacement Img_1810
Once the swing arm is removed, you will want to remove the drive shaft - easiest way to release it is to gently place a crowbar against the universal joint and lever, carefully against the gearbox casing (use thin plywood to protect the gearbox surface). A gentle application of pressure on the crow bar will result in the drive shaft popping out of the circlip that retains it at the front end. Others use a little more "percussive" force (FBH) to achieve this, but wielding a FBH can result in denting/bruising the drive shaft. You will also need to remove the battery if you are replacing the GPI switch...the wire routes up under the battery tray.

You now have pretty good access to the GPI switch to be able to remove it...noting the comments in previous posts about the 7mm bolts (M4?) - yes, my first attempt resulted in these buggers shearing! The 7mm bolt heads are so close to the body of the GPI switch, I couldn't get a standard size 7mm socket to slot over the heads - I resorted to grinding down my socket to make it thinner...obviously, this makes it much weaker, but the torque generally applied to the size of bolt is pretty low, so it didn't need to be as thick as it was originally made. 
K1100LT Gear Position Sensor (GPS) replacement Img_6910 
If you do have to drill out and go for M5 bolts, then you need to be accurate - it doesn't take much angular misalignment to make the GPI read incorrectly...very frustrating when you've fitted a new GPI switch and didn't test it fully before reassembly!! Also, the stock GPI switch won't take M5 bolts without modification - the switch assembly has brass bushes surrounding its mounting points, which come out easily if you try to drill these holes to 5mm...but the larger holes can add to your re-mounting woes/alignment issues. I discovered this when replacing the GPI on Gretel - the new GPI switch wouldn't take the over size 5mm allen bolts that had been installed by the PO and needed modification. However, it has worked absolutely fine ever since!

All in all (with a fair wind and following sea), the job can be done in about 4 hours...but them thar pesky fasteners can add several more hours and some colourful language to the equation if they don't come out nicely.

It is (surprisingly) a satisfying job to do...and allows all those extra "while I'm in there" jobs like greasing your splines, changing the clutch actuating lever needle bearings, checking/replacing the clutch actuating arm boot etc. If you follow the resealing advice above for the new or repaired GPI switch, you will have the deep satisfaction of not having to do the job again for many years to come (by which time you have forgotten how you did it before).


__________________________________________________
K1100LT Gear Position Sensor (GPS) replacement Uk-log10 K1100LT Gear Position Sensor (GPS) replacement Sco-lo15
                              Paul  K1100LT Gear Position Sensor (GPS) replacement 905546712

"Heidi" K100LT 1991 (Grey) (VIN 0190172 Engine No. 104EB 2590 2213) - 5th owner. January 2014 (34,000 - 82,818 miles and counting....)
"Gretel" K100LT 1989 (Silver Grey) (VIN 0177324 Engine No. 104EA 2789 2211) - 4th+ owner. September 2015 (82,684 miles and counting....). Cat C Insurance write-off rebuild Feb 17
"Donor" K100LT 1990 (Red)  (VIN 0178091 Engine gone to Dai) - 6th & final owner (crash write-off now donor bike).   June 2012 (73,000 miles) to November 2013 (89,500 miles)
    

Tom G

Tom G
Life time member
Life time member
G'day All, Great thread so far and the only addition I will make is to suggest replacing the 4mm hex head screws with 4mm Allen Keyed screws. It makes it so much easier to fit and remove these screws. Cheers Tom


__________________________________________________
1986 K100RT Ex Police (Slightly modified)
2010 Suzuku DL650 V Strom
1992 R100R
    

charlie99

charlie99
VIP
VIP
good post paul K1100LT Gear Position Sensor (GPS) replacement 112350


__________________________________________________
cheezy grin whilst riding, kinda bloke ....oh the joy !!!! ...... ( brick aviator )

'86 K100 RT..#0090401 ..."Gerty" ( Gertrude Von Clickandshift ) --------O%O
'86 k100 rs.. #######..  "Fred " (f(rame) red ) ( Fredrick leichtundschnell ) - -
bits and pieces from many kind friends across the k100 world ...with many thanks ..
1987 k100rs ########   "Red"  - (red sports rs TWB style )
1989 K100rt #009637   "Black Betty"  (naked rt ala Nigel , now sporting an rs main fairing )
    

Point-Seven-five

Point-Seven-five
Life time member
Life time member
Tom FR wrote:G'day All, Great thread so far and the only addition I will make is to suggest replacing the 4mm hex head screws with 4mm Allen Keyed screws. It makes it so much easier to fit and remove these screws. Cheers Tom
I replaced them on your advice and can definitely say that it is WAY easier to get an Allen wrench on them than the socket I had to use to get the old screws out.  I used stainless steel with lots of copper anti-sieze to make sure the next time is easier than the last.


__________________________________________________
Present: 1991 K100RS "Moby Brick Too"
 
Past:
1994 K75RT "Ilsa, She Wolf of the SS"
1988 K100RS SE "Special Ed"
1994 K75S "Cheetos"
1992 K100RS "Moby Brick" R.I.P.
1982 Honda FT500
1979 Honda XR185
1977 Honda XL125
1974 Honda XL125
1972 OSSA Pioneer 250
1968 Kawasaki 175
    

92KK 84WW Olaf

avatar
Life time member
Life time member
Paul

When I got in at mine we did as you did and unbolted the entire assembly as one. Its quite a lot simpler than one would believe as long as nothing is seized up. Two people who know what they are doing would be done in an hour on a non ABS 2V K.

Personally I think I would be putting a new GPI in to a K of unknown history if doing any other job in there, the darn things die eventually.


__________________________________________________
1992 K100LT 0193214 Bertha Blue 101,000 miles
1984 K100RT 0022575 Brutus Baja Red 578 bought 36,000 now 89,150 miles
1997 K1100LT 0188024 Wotan Mystic Red 689 58,645 now 106,950 miles Deceased.
1983 K100RS 0011157 Fricka 606 Alaska Blue 29,495 miles Damn K Pox Its a Bat outta Hell Now 58,200 miles. 
1996 K1100LT 0233004 Lohengrin Mystic Red 38,000 miles currently 51,800 miles.
1983 K100RS 0004449 Odette R100 colours 58,000 miles. Sprint fairing now 63,390 miles

Past:
1968 Yamaha 80 YG1
1971 Yamaha 125 YAS-1
1968 Honda 125 SS
1970 Honda CD 175
1973 Honda CB500-4
Honda CX 500
    

Point-Seven-five

Point-Seven-five
Life time member
Life time member
92KK 84WW Olaf wrote:Personally I think I would be putting a new GPI in to a K of unknown history if doing any other job in there, the darn things die eventually.
I have successfully refurbished the gear position switch on two of my bikes.  Granted, they were later model bikes and the switch may be a different design, but once the switch is carefully opened it is fairly easy to clean the internal parts.  You just need to be very careful so you don't lose any of the four tiny springs.

What I found in mine was dirt in the bottom of the holes the springs reside in that prevented electrical contact.  The thin tube on my DeoxIt can did a good job of flushing it out.  How the heck did that dirt travel all that way to get in those holes???

Reassembly is straightforward and I used a couple wraps of self amalgamating tape(good stuff to have in your tool kit) on the joint to keep moisture out.  I also put a thin smear of silicone caulk on the mating face to the transmission to help the no longer available gasket keep moisture out.

I figure an hour working on that switch is a good $141 trade off.


__________________________________________________
Present: 1991 K100RS "Moby Brick Too"
 
Past:
1994 K75RT "Ilsa, She Wolf of the SS"
1988 K100RS SE "Special Ed"
1994 K75S "Cheetos"
1992 K100RS "Moby Brick" R.I.P.
1982 Honda FT500
1979 Honda XR185
1977 Honda XL125
1974 Honda XL125
1972 OSSA Pioneer 250
1968 Kawasaki 175
    

92KK 84WW Olaf

avatar
Life time member
Life time member
Ah well it's got to do with the price of parts.....I did pay well under half that for a brand new one. For $141 I would refurbish it too. I put the old one in my box for later repair.


__________________________________________________
1992 K100LT 0193214 Bertha Blue 101,000 miles
1984 K100RT 0022575 Brutus Baja Red 578 bought 36,000 now 89,150 miles
1997 K1100LT 0188024 Wotan Mystic Red 689 58,645 now 106,950 miles Deceased.
1983 K100RS 0011157 Fricka 606 Alaska Blue 29,495 miles Damn K Pox Its a Bat outta Hell Now 58,200 miles. 
1996 K1100LT 0233004 Lohengrin Mystic Red 38,000 miles currently 51,800 miles.
1983 K100RS 0004449 Odette R100 colours 58,000 miles. Sprint fairing now 63,390 miles

Past:
1968 Yamaha 80 YG1
1971 Yamaha 125 YAS-1
1968 Honda 125 SS
1970 Honda CD 175
1973 Honda CB500-4
Honda CX 500
    

Dai

Dai
Life time member
Life time member
Occasionally they come up cheap on ebay (<£20). I grabbed two that way; one turned out to be corroded beyond recovery but the other was overhauled and bagged up for future use. I count £40 as a win, despite the knackered one.


__________________________________________________
1983 K100 naked upgraded to K100LT spec after spending time as an RS and an RT
1987 K100RT
Others...
1978 Moto Guzzi 850-T3, 1979 Moto Guzzi 850-T3 California,1993 Moto Guzzi 1100ie California
2020 Royal Enfield Bullet 500
    

View previous topic View next topic Back to top  Message [Page 1 of 1]

Permissions in this forum:
You cannot reply to topics in this forum