BMW K bikes (Bricks)


You are not connected. Please login or register

Go to page : Previous  1, 2, 3

View previous topic View next topic Go down  Message [Page 3 of 3]


101Back to top Go down   Making it my own - Page 3 Empty Re: Making it my own Mon Apr 09, 2018 1:33 am

VinceD


Silver member
Silver member
Thanks robmack, I searched around the forums for some gauge disassembly-pics and found a topic by nitrogen 'fixing my instrument cluster'. There are some pics describing what is what but it isn't the same as what I have...
Could you help me out here? By rough shape comparison the 'bent' board would be the fuel-indicator part, but it was on the other side of the unit than the indicator light. The flat one was located there... furthermore there are some other pieces in there but they seem to be for the speed indicator since they are sandwiched between the indicator-plate and the indicator--mechanism.

If I could take a guess I would say that it's the bent one with bottom left the ground and positive and 'G'-labeled the input. Top right 'A' would be where I attach the led with the other end to ground. It's all guessing however...


102Back to top Go down   Making it my own - Page 3 Empty Re: Making it my own Mon Apr 09, 2018 2:59 am

robmack

robmack
Life time member
Life time member
Look at this topic:  https://www.k100-forum.com/t13127-reference-bmw-instrument-cluster-schematics

It's the picture of the board under the topic "Early Fuel Level Sensor (4L/7L lights)".  The schematic is at the link called "Larger Image" just under that picture.   That will help you to identify the board and also help you to wire it up. Essentially, you want to attach the cathode of a 12V LED to J5.  The anode of the 12V LED will be connected to +12V.


__________________________________________________
Robert
1987 K75 @k75retro.blogspot.ca
http://k75retro.blogspot.ca/
    

103Back to top Go down   Making it my own - Page 3 Empty Re: Making it my own Thu Apr 19, 2018 6:56 am

VinceD

VinceD
Silver member
Silver member
I couldn't find the correct combination using the diagram because my board differed alot from the one depicted. I just tried every combination using crocodile-clamps and a LED while dipping the floater under with my hand in the tank. The 'A' on the previous pic is connected to white from the tank, the 'upside down T' is connected to the LED and ultimately to 12V. Maybe someday someone else will need this info too.


I had some trouble installing it but only because the connector I installed for the four wires coming from the tank was stretched so the pins came out. It wasn't put together well in the first place... (By me) I got some other new 4-pin connectors laying around and some 2-pinned ones ordered off of Ali Express and when I find the correct pliers I'll go around fixing all the makeshift connections I made. The problem with the connector that was installed was that I was convinced I could make it using solder and regular pliers. Now I know better 😊.


__________________________________________________
I am working to the day of riding my revised : '85 K100 RT' It's only a few months younger than myself.  What a Face
Please comment my progress if you have suggestions, its on the board called 'making it my own'
    

104Back to top Go down   Making it my own - Page 3 Empty Re: Making it my own Sat Jun 23, 2018 3:35 am

VinceD

VinceD
Silver member
Silver member
It's been a while since I posted something here but it's been a while since I actually did something to the bike besides riding it  Smile

I installed the front fork gaiters and they look really nice in my own opinion. I ordered them from motobins UK. The serial number is BMW: 31 42 1 234 908
The installation of those caused me a bit of a sweat, I used my car jack to lift the bike up whilst using tensioning straps to keep it high and upright. It was gently swinging troughout the installation. Creepy to see. I'll invest in a better system when I find an affordable and good sized one for my garage. 

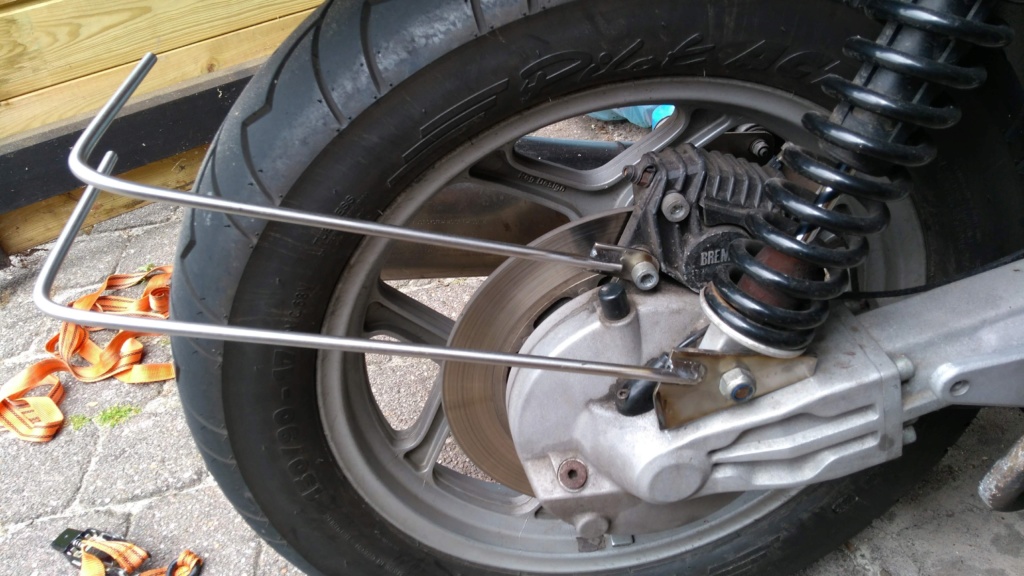
I'm also making a plateholder. The two curved bars are ready and installed and when I get the chance to visit my friend down the street, some bars going between the two curved bars will be welded on for sturdyness and reducing the vibration. After that they will need a paintjob, wiring for platelighting and hopefully that will be that.
Photo's will be added soon.


__________________________________________________
I am working to the day of riding my revised : '85 K100 RT' It's only a few months younger than myself.  What a Face
Please comment my progress if you have suggestions, its on the board called 'making it my own'
    

105Back to top Go down   Making it my own - Page 3 Empty Re: Making it my own Sat Jun 23, 2018 3:41 am

VinceD

VinceD
Silver member
Silver member
Ok, so here are the photo's. Even sooner than i tought...
Making it my own - Page 3 Img_2010
Making it my own - Page 3 Img_2011
Making it my own - Page 3 Img_2012


__________________________________________________
I am working to the day of riding my revised : '85 K100 RT' It's only a few months younger than myself.  What a Face
Please comment my progress if you have suggestions, its on the board called 'making it my own'
    

Sponsored content


View previous topic View next topic Back to top  Message [Page 3 of 3]

Go to page : Previous  1, 2, 3

Permissions in this forum:
You cannot reply to topics in this forum