2

 Re: Front fog lights assembly Sun May 02, 2010 6:26 pm
Alex_GER
Silver member

Here's a link to the topic in flyingbrick:
http://www.flyingbrick.de/board/viewtopic.php?f=9&t=2439&hilit=zusatzscheinwerfer
It's in German though, but you can have a look at the pics and follow the links or copy'n'paste the brand names...
http://www.flyingbrick.de/board/viewtopic.php?f=9&t=2439&hilit=zusatzscheinwerfer
It's in German though, but you can have a look at the pics and follow the links or copy'n'paste the brand names...
__________________________________________________
Jod alles chlor, liebe Krüße,
euer KLotz
 Doenerschuss || Portfolio || MPI
 3

 Re: Front fog lights assembly Sun May 02, 2010 7:40 pm
Vudis
Silver member

Thanx Alex_GER. SOme interesting solutions 
4

 Re: Front fog lights assembly Sun May 02, 2010 8:07 pm
Crazy Frog
admin

To be efficient, fog lights have to be mounted as close as possible from the road.
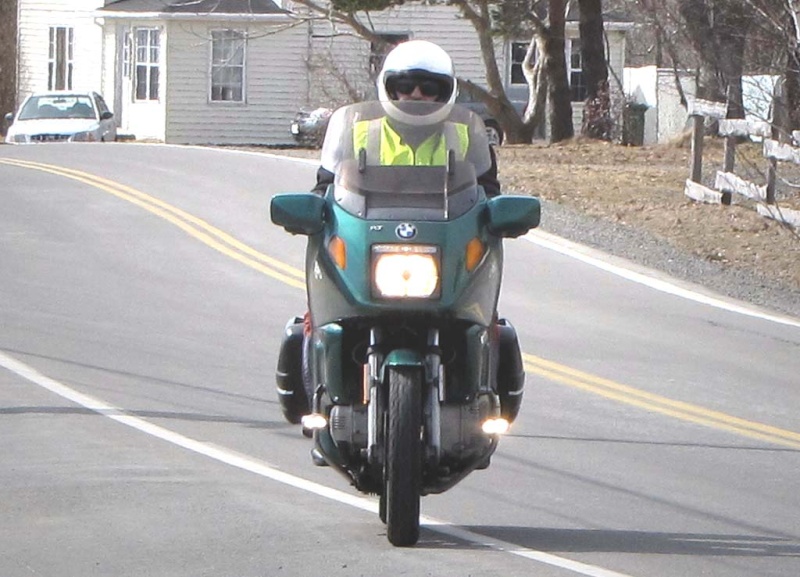
I don't have fog lights but driving lights and they are mounted on the crash bar.
Here is a picture of the lights mounted on the bike:
Following is the details of the mounting. (I haven't used my engineering software for 3 years. It was a challenge to design it in 3D )
)
When mounting the lights, I recommend to put some rubber washers between the mounting and the light bracket as the vibration may kill the bulbs. (It's almost impossible to get an area without vibrations on the K100)
With this type of bracket, I am pretty confident that I didn't compromise the strength of the crash bars. I had these light for almost a year before finding the best area and the best way to install them. After 3 years, i am still happy with this solution. It's clean and the lights look like it was a factory install.
Note: The hole in my crash bar is slightly eliptical. This permit to rotate the whole mounting to get the best setting of the lights.
There is always a small chance to have water entering the crash bar, and I drilled a 1/8 diameter hole on the bottom of the bars to have the water getting off in case it finds its way in.
This is easy to do and you have 2 solutions to get the round shape of the washers. filing or taking a piece of round stock and drilling a hole equal to the diameter of the crash bar. You then cut a slice on each side of the hole Keeping it at least 6mm (1/4") thick.
What I also forgot to mention on my drawing is that the washers are the main parts of the mounting. The area of pressure on the bars is equal to the whole surface of both washers. Without these washers, this area would be restricted to the contact surface between the spacer & bolts and the crash bar.
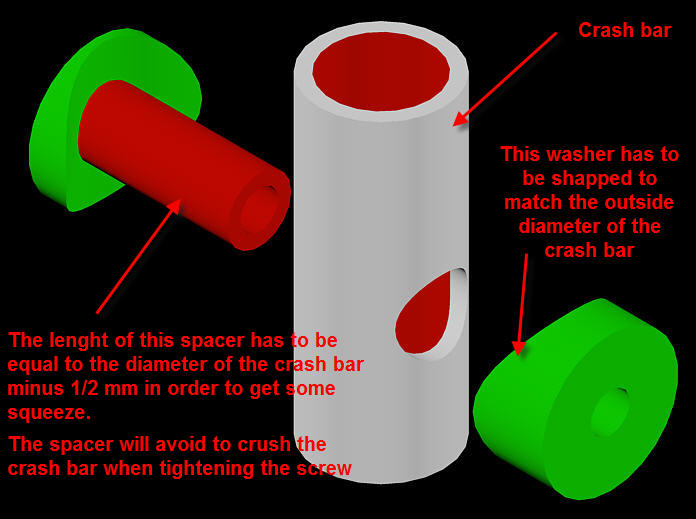
You get the idea and I Hope this helps.
Bert
I don't have fog lights but driving lights and they are mounted on the crash bar.
Here is a picture of the lights mounted on the bike:

Following is the details of the mounting. (I haven't used my engineering software for 3 years. It was a challenge to design it in 3D
When mounting the lights, I recommend to put some rubber washers between the mounting and the light bracket as the vibration may kill the bulbs. (It's almost impossible to get an area without vibrations on the K100)
With this type of bracket, I am pretty confident that I didn't compromise the strength of the crash bars. I had these light for almost a year before finding the best area and the best way to install them. After 3 years, i am still happy with this solution. It's clean and the lights look like it was a factory install.
Note: The hole in my crash bar is slightly eliptical. This permit to rotate the whole mounting to get the best setting of the lights.
There is always a small chance to have water entering the crash bar, and I drilled a 1/8 diameter hole on the bottom of the bars to have the water getting off in case it finds its way in.
This is easy to do and you have 2 solutions to get the round shape of the washers. filing or taking a piece of round stock and drilling a hole equal to the diameter of the crash bar. You then cut a slice on each side of the hole Keeping it at least 6mm (1/4") thick.
What I also forgot to mention on my drawing is that the washers are the main parts of the mounting. The area of pressure on the bars is equal to the whole surface of both washers. Without these washers, this area would be restricted to the contact surface between the spacer & bolts and the crash bar.

You get the idea and I Hope this helps.
Bert
Last edited by Crazy Frog on Mon May 03, 2010 12:58 am; edited 3 times in total
__________________________________________________
  1986 k75, 1985 K100rt, 1986 k75, 1985 K100rt, |
5

 Re: Front fog lights assembly Sun May 02, 2010 8:12 pm
Vudis
Silver member

Wow!!!! That's what I really wanted and meant....
Another project, oh no.......
Another project, oh no.......
6

 Re: Front fog lights assembly Mon May 03, 2010 12:55 am
blaKey
Life time member

Hey Vudis, here are some simple brackets that attach to your front forks. Have a look here at ebay.
__________________________________________________
Neil
K100RS 1986 RED!
Dress for the ride and the potential slide.
7

 Re: Front fog lights assembly Mon May 03, 2010 3:36 am
phil_mars
Life time member

What is also interesting on that site is the LED fog lights which seem damn cheap and should not be susceptible to vibration.
8

 Re: Front fog lights assembly Mon May 03, 2010 10:32 am
Crazy Frog
admin

phil_mars wrote:What is also interesting on that site is the LED fog lights which seem damn cheap and should not be susceptible to vibration.
Last week I was reading articles on LED light as I was considering them for my house.
To sum up my reading, unless you buy a high quality product, you are waisting your money.
The "made in China" are cheap, but their lifespan is far from what they advertise. One of the other complain is that they are losing their brightness over time.
Laptop manufacturers had already tried to replace the LCD back light (cold cathode fluorescent lamp) with LEDs. It was obviously a problem as everybody went back to fluorescent lights.
The latest technology is OLED. I believe that one of our member was doing research on Nanobiotechnology (Alex_GER?) and he can tell us more about it.
Last fall I went to a trade show and saw the new GE commercial line of products using OLED technology. I was very impressed by the brightness, but this "new" technology is still way too expensive for my wallet
Here is the future of OLED lightning:
__________________________________________________
  1986 k75, 1985 K100rt, 1986 k75, 1985 K100rt, |
9

 Re: Front fog lights assembly Mon May 03, 2010 10:54 am
phil_mars
Life time member

Currently the room I am in is lit (dimly I grant you) by 2W! of led lighting.
If I wanted to spend $50 per globe I could have upped that to 6W (3ea) and theoretically equivalent to 100w (total) Halogen globes.
LED monitors are already appearing for the same price as LCD ones but I am interested to see where the LED driving lights are going as they are starting to make an appearance and I would never have thought they would have the brilliance and distance qualities demanded . It would seem thay may surpass HID technology.
As usual time will tell.
__________________________________________________
Regards,
Phil
10

 Re: Front fog lights assembly Fri Mar 11, 2011 3:58 pm
Oldgoat
Life time member

Hey Bert can you tell me the model and wattage draw of the lights you are using? I really like the stock appearance of your setup!
OG
OG
11

 Re: Front fog lights assembly Fri Mar 11, 2011 9:05 pm
Crazy Frog
admin

These one are very cheap (Understand Made in China). They are H3 and not very good at night. I installed them as driving lights for day time. They are very efficient for this purpose.
__________________________________________________
  1986 k75, 1985 K100rt, 1986 k75, 1985 K100rt, |
12

 Re: Front fog lights assembly Sat Mar 12, 2011 1:07 am
Guest
Guest
Check these beauties! I used to sell them, they are not inexpensive, but are incredibly versatile and everything (even the globes) are covered under a full lifetime warranty. They clamp to the fork legs (old style) or are mounted on the upper caliper bolt. Very slick and effective.
http://www.motolight.com/page/401585602
http://www.motolight.com/page/401585602
13

 Re: Front fog lights assembly Sat Mar 12, 2011 6:40 am
walfish
Life time member

Hey TWB, those lamps seem to be the answer, looking at your web link I see there are no dealers here in the UK, but I'm sure someone will have them.
14

 Re: Front fog lights assembly Sat Mar 12, 2011 12:23 pm
Crazy Frog
admin

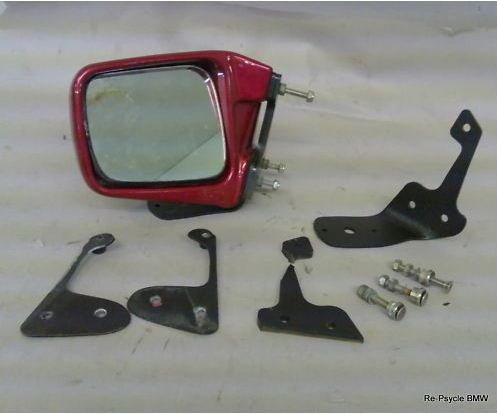
Re-Psycle has this set of bracket for sale on Ebay (Brackets only for $100 with shipping  ). See there
You get the idea... An afternoon drilling, filing and hammering could produce the same result for about $10
I personally don't like the idea of attaching the lights on the fairing. In case of a mild crash the mirrors will pop out and the fairing will sustain minimal damages. These brackets will crush the side of the fairing.
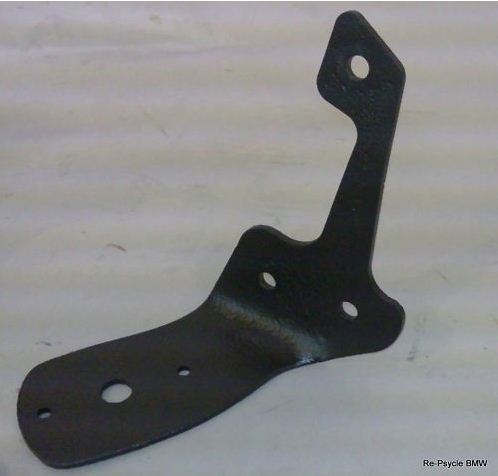

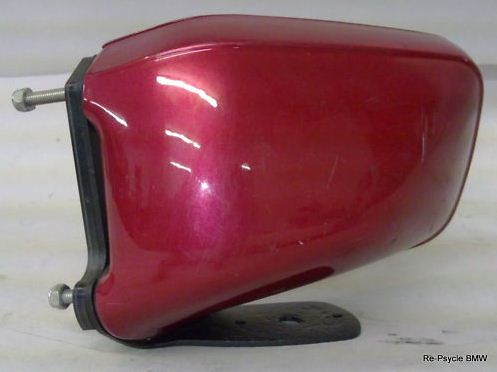
 ). See there
You get the idea... An afternoon drilling, filing and hammering could produce the same result for about $10
I personally don't like the idea of attaching the lights on the fairing. In case of a mild crash the mirrors will pop out and the fairing will sustain minimal damages. These brackets will crush the side of the fairing.


__________________________________________________
  1986 k75, 1985 K100rt, 1986 k75, 1985 K100rt, |
15

 Re: Front fog lights assembly Sat Mar 12, 2011 2:46 pm
BIG D
Life time member

USED AS WELL
BIG D
16

 Re: Front fog lights assembly Mon Mar 21, 2011 8:18 am
Crazy Frog
admin

If you are planning to mount your driving/fog lights on the crash bar, do not hard wire them right to the headlight or relay box. Install a plug near the crash bar. It will permit to remove the crash bar without having to remove the light.
Here is where I installed the plug.
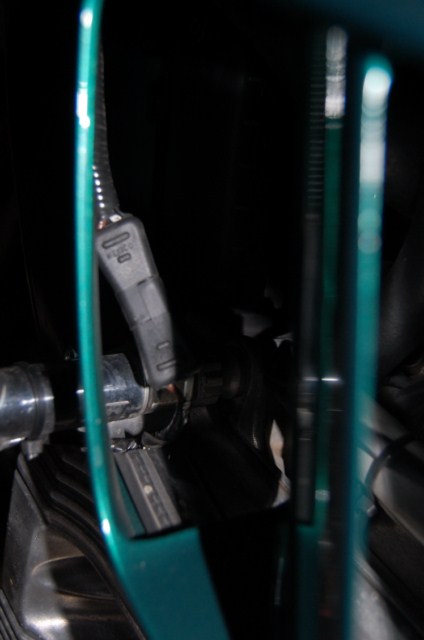
Here is another tip for the RT owners:
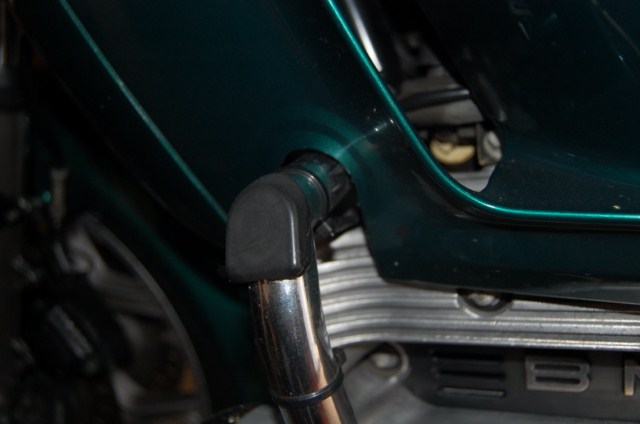
In order to remove the lower fairing, you have to remove the crash bars. I modified my lower and in stead of having a hole I cut a slot where the bars bolt on the frame. Now I just have to tilt the lower to remove it. Much easier if you have a problem on the side of the road
Here is where I installed the plug.

Here is another tip for the RT owners:
In order to remove the lower fairing, you have to remove the crash bars. I modified my lower and in stead of having a hole I cut a slot where the bars bolt on the frame. Now I just have to tilt the lower to remove it. Much easier if you have a problem on the side of the road

__________________________________________________
  1986 k75, 1985 K100rt, 1986 k75, 1985 K100rt, |
17

 Re: Front fog lights assembly Mon Mar 21, 2011 8:55 am
Guest
Guest
If you are using a nice, two wire quick-disconnect SAE connector as in CF's photos, no worries, no need to be concerned. But if you intend to use a single wire to positive and then earth (ground) a wire to the engine protectors be sure to also connect short leads to the chassis or engine as the engine protectors are rubber mounted and therefore 'isolated'.
This is Electricity 101, but a gentle reminder can help sometimes.
This is Electricity 101, but a gentle reminder can help sometimes.
18

 Re: Front fog lights assembly Mon Mar 21, 2011 7:40 pm
BIG D
Life time member

Crazy Frog wrote:Here is another tip for the RT owners:
In order to remove the lower fairing, you have to remove the crash bars. I modified my lower and in stead of having a hole I cut a slot where the bars bolt on the frame. Now I just have to tilt the lower to remove it. Much easier if you have a problem on the side of the road
Thats such a good idea Bert the cut out for the crash bars, now where is my fret saw got to copy that.
BIG D
Similar topics
Permissions in this forum:
You cannot reply to topics in this forum


