1

 Seized and sheared fairing fixing Sun Jan 22, 2012 2:46 pm
MT350Explorer
Life time member

Pretty slim subject matter for a post I know but hey, it is Sunday afternoon and I'm waiting for parts to arrive for the bike and don't have anything better to do!
I'm just working my way through the bike inspecting and replacing things as I go and this now means removing the fairing to get access underneath to see what needs doing. The lower fairing sections on both sides had to come of so I duly ordered 6 new shiny screws that hold the forward left and right hand sections of the RS fairing to forward centre panel. I'd sprayed the fixings with penetrating oil in the hope this might make them easy to come out but to no avail! They were all badly rusted and crubling to nothing at the sight fo s crewdriver. In teh end of the 6 I got 5 out, 2 of which were a real pig and needed every tool in the garage - number 6 of course was totally solid and quite quickly got to the point where it was a real, rounded mess. Eventually after much spitting and cursing, several cups of tea and a couple of hours of effort using everything except the kitchen sink, it sheared leaving most of thescrein the brass thread that's an integral part of the fairing.
So how to get the screw stub out of the brass thread? Those with superior mechanical skills will doubtloess be able to drill it out and rethread but as I'm a bit lacking in this department my solution I'm afraid (after a lot of thought and more cursing) was to cut off the lug with a hacksaw below the bottom of screw and then glue a nut to the new, flat surface. I've ordered some fibreglass so I can put some resin and mattting around the nut as well. Fingers crossed it will be solid enough to take the new screw (duly copper greased...). One of thoise half hour jobs taht takes a wee while longer than anticipated!
Next job is to fix the crack in the panel -caused by it being dropped I'd guess. Should be quite straightforward but then who knows...!
In the next thrilling installation I'll post up my mashed drive shaft that came as a free gift with the bike!
All the Best
Dave
What's left of the original screw

The 'fix' above and an original threaded hold below

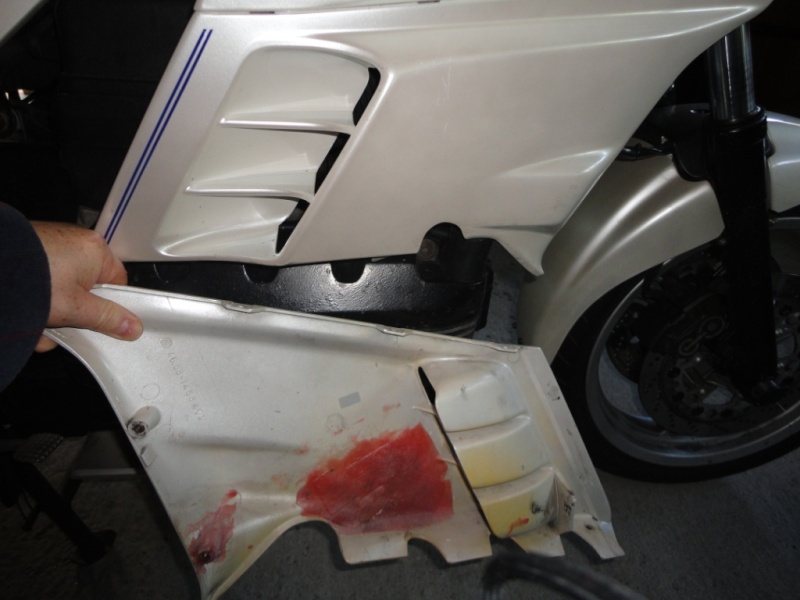
The crack I'll be fixing next week

I'm just working my way through the bike inspecting and replacing things as I go and this now means removing the fairing to get access underneath to see what needs doing. The lower fairing sections on both sides had to come of so I duly ordered 6 new shiny screws that hold the forward left and right hand sections of the RS fairing to forward centre panel. I'd sprayed the fixings with penetrating oil in the hope this might make them easy to come out but to no avail! They were all badly rusted and crubling to nothing at the sight fo s crewdriver. In teh end of the 6 I got 5 out, 2 of which were a real pig and needed every tool in the garage - number 6 of course was totally solid and quite quickly got to the point where it was a real, rounded mess. Eventually after much spitting and cursing, several cups of tea and a couple of hours of effort using everything except the kitchen sink, it sheared leaving most of thescrein the brass thread that's an integral part of the fairing.
So how to get the screw stub out of the brass thread? Those with superior mechanical skills will doubtloess be able to drill it out and rethread but as I'm a bit lacking in this department my solution I'm afraid (after a lot of thought and more cursing) was to cut off the lug with a hacksaw below the bottom of screw and then glue a nut to the new, flat surface. I've ordered some fibreglass so I can put some resin and mattting around the nut as well. Fingers crossed it will be solid enough to take the new screw (duly copper greased...). One of thoise half hour jobs taht takes a wee while longer than anticipated!
Next job is to fix the crack in the panel -caused by it being dropped I'd guess. Should be quite straightforward but then who knows...!
In the next thrilling installation I'll post up my mashed drive shaft that came as a free gift with the bike!
All the Best
Dave
What's left of the original screw

The 'fix' above and an original threaded hold below

The crack I'll be fixing next week


 I have some experience of bonding skin with epoxy resins!


