BMW K bikes (Bricks)


You are not connected. Please login or register

View previous topic View next topic Go down  Message [Page 1 of 1]


1Back to top Go down   New project Empty New project Mon Mar 11, 2019 4:31 pm

TheJoker

TheJoker
Silver member
Silver member
So on Saturday I'll be the owner of this new project; it hasn't been running in a while and they have lost the keys so I've got my work set out for me. It has cost me half the price of a set of leading links which I'm happy about. Now I know I'm going have to remove the sidecar to actually work on the bike. As with the size of the sidecar there just wont be enough room to get down to spark plugs or cables.

So Just wanted to ask what is the best way to ensure that all of it stays at the right angle; I'm hoping to unbolt do the work then bolt it straight back up without any adjustments. 
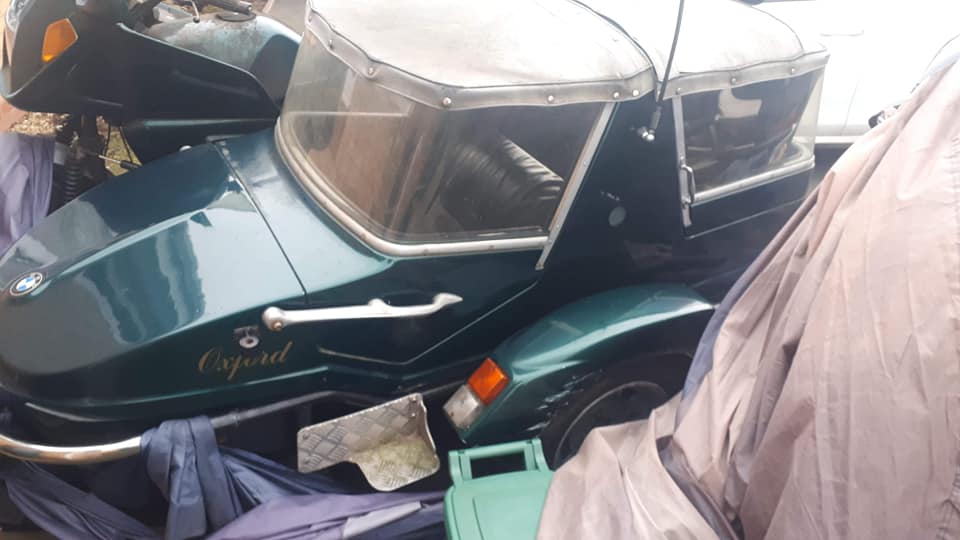
New project K100_p11
New project K100_p10

Kind Regards,
Sam.


__________________________________________________
My Bike List past to present so far;

Lexmoto (first bike ever to ride) , CB125 TDC 86 , CG125 89 , GN125 97 , ER5 96 , K100 RS 84

84/01 K100rs 0013627
    

2Back to top Go down   New project Empty Re: New project Mon Mar 11, 2019 5:57 pm

AL-58

AL-58
Life time member
Life time member
That really depends on how its attached.  Mountings vary from maker to maker, sidecar fitter to sidecar fitter.

Pics of the mounts themselves would help

Al


__________________________________________________
'93 K1100LT
'08 F650GS (798cc)
'19 R1250RS

+ another boxer engined motorcycle and sidecar

"When I'm too old and too foolish to handle a sidecar I'll buy a Sportsbike"

New project K-dogs10
    

3Back to top Go down   New project Empty Re: New project Mon Mar 11, 2019 6:35 pm

Saxon7

Saxon7
Life time member
Life time member
Depending on what specific work you plan on doing, you could take the boat off first and put it to one side and see how much room to work that gives you?

https://www.youtube.com/channel/UCc7NNjWO7nHEhMpErSDJ5Hw
    

4Back to top Go down   New project Empty Re: New project Tue Mar 12, 2019 2:14 am

tinyspuds

tinyspuds
Life time member
Life time member
As Al says, they are all different. Mine has a four point QD atachment system that retains the set up, but I have never considered detaching the chair even so.
Once the l/h fairing lower is off you may be surprised at how much working room there is (especially if you are prepared to relax your standards around working comfort, NB. I am built like a snake with malnutrition).
On that side of the bike with my l/h tub in place I have recently:
- replaced all fuel lines
- replaced the fuel injectors (and given the surroundings a decent clean)
- removed the rear wheel
- replaced exhaust headers
- replaced plugs and leads
- performed compression test
- fitted a steering damper and brackets 
- adjusted bike lean
- drilled the tub for routing battery leads to chair
Where I have had to bite the bullet:
- cam cover off 
- gasket replacement
- valve gap measure
- adjust toe in *
- level chair *
- drill and extract sheared cam cover bolt *
- helicoil cam cover bolt hole *;
I have disconnected chair power, unbolted the box from the chassis, slid the tub backwards onto a car creeper to move it out the way.
Only * jobs really needed that, the others could have been done at a pinch, it was just easier on balance to shift the tub.
You don’t say whether the bike still has a centre stand, mine doesn’t so when I loosened the chair fittings I had to stabilise the bike with ratchet straps (rafters to chassis). With my QD fittings, accurate re-attachment wouldn’t have been an issue, but otherwise I wouldn’t have thought there was enough stability to provide a fixed reference point for re-attach (but that again will probably depend on how your fittings are set up).
Finally, my chair electrics route under the chassis into a mud encrusted poor quality connector block and housing (which I will upgrade and re-site when I find something suitable) inside the chair wheel arch. To disconnect the electrics the first time I had to jack up the wheel side and wear goggles. The next time I just unbolted the wheel arch and left it hanging from the chassis while I slid the box off.
Hope this helps.
Cheers, Stu


Last edited by tinyspuds on Tue Mar 12, 2019 2:17 am; edited 1 time in total (Reason for editing : completeness)


__________________________________________________
1985 BMW K100RT + Hedingham HUB and LL’s. VIN 0028106.
1986 K100RS in boxes. VIN 0141918.
1954 Royal Enfield 350 Bullet. Original.
2000 Hayabusa with Charnwood chair, Wasp forks and EZS wheels.
    

5Back to top Go down   New project Empty Re: New project Wed Mar 13, 2019 7:34 pm

TheJoker

TheJoker
Silver member
Silver member
Thank you for the replies I do appreciate everyone taking the time to make them. It fills me with confidence that I should be able to do the majority of work with it all attached. The only real thing I'm dreading would be replacing the clutch. But these are all what if's as I won't know what I need to do till until it arrives on Saturday.

If anyone wants I'll update the post with more images.


__________________________________________________
My Bike List past to present so far;

Lexmoto (first bike ever to ride) , CB125 TDC 86 , CG125 89 , GN125 97 , ER5 96 , K100 RS 84

84/01 K100rs 0013627
    

6Back to top Go down   New project Empty Re: New project Thu Mar 14, 2019 3:39 am

tinyspuds

tinyspuds
Life time member
Life time member
Hi Sam,
Should also have mentioned access restrictions to and around the timing chain cover. I have no experience beyond my Hedingham set up but imagine all have similar issues.
To remove one of the allen bolts for the HES cover I needed a very short reach allen head. I think a couple of the timing cover bolts will be the same - which is why I haven’t checked my chain and tensioner yet.
In any event it’s worth knowing that the std tool kit allens may not get behind your sub frame if you have problems on the road.
Stu


__________________________________________________
1985 BMW K100RT + Hedingham HUB and LL’s. VIN 0028106.
1986 K100RS in boxes. VIN 0141918.
1954 Royal Enfield 350 Bullet. Original.
2000 Hayabusa with Charnwood chair, Wasp forks and EZS wheels.
    

Sponsored content


View previous topic View next topic Back to top  Message [Page 1 of 1]

Permissions in this forum:
You cannot reply to topics in this forum