1

 Summer Style K1100LT Wed Nov 30, 2016 8:17 am
Gaz
Life time member

This little project started about March 2016 when I noticed the main support bracket for the top fairing was not what it used to be.

Left side

Right side
So I best get the whole lot off and contemplate some repairs. Well the situation didn't get any better once the fairing was off ......... I'm sure that brass threaded insert and chunk of fairing material in my hand should be attached to the inside of the fairing.

There were a number of other cracks on the inside as well, I guess a testament to the 150,000km on what passes for regional roads in Oz and my "follow the road less travelled" approach to touring this great country.
A passing comment from my dearest as she walked past the stripped K1100 sitting on the apron in front of my shed that "it looks a lot better with all that stuff off it" started the brain ticking over. Since it would take me a while to repair the fairing and bracket while attending to all the other things in life, maybe I should set the K1100 up so that it can be naked for most of the year (when it's warm to hot here in Oz) but be able to re-install the LT fairing for those mid winter trips to the mountains.
I had seen a photo of a naked K1100 in Europe sporting a MRA Vario windscreen when I had been researching windscreens for my other two bikes and in fact have them fitted. This K1100 photo was to be my inspiration, thanks Olaf Kunde wherever you are.

Having already built my own headlight mounting for my naked K75 project I planned to use the same approach, which is to fabricate a backing plate that is securely mounted to the triple clamps and then cut out side plates that attach to it for supporting the headlight and indicators.
One difference on the K1100 to the K75 is that only the top triple clamp has threaded holes where a backing plate can be secured.

My solution for this was to use the two 6mm bolts in the top clamp and then fabricate two C shaped clamps that would clamp the lower portion of the backing plate to the fork tubes.

Which ends up looking like this.

To mount the instrument cluster I used a bracket from a K100RT instrument set and bolted it to the cross bar on the backing plate. Locating the instruments had been the determining factor for the dimensions of the backing plate.

While working on these ideas I searched for one of the round headlights in a metal shell and also a set of naked K100 radiator shrouds. I managed to get the radiator shrouds on fleabay USA and the headlight from Victoria (expensive !!).
Since I wanted to be able to change to the fairing mode for winter I had the challenge of what to do with the relays and wiring that lived in the fairing. With lots of measuring and separating wiring from the original looms and re-wrapping it I found places for it all to be located on the backing plate then welded in a number of small tabs to screw the relays to.
Now it was onto the side plates to mount my headlight and indicators using my tried and proven method of working with MDF or plywood until I was happy with the shape then turn it into aluminium.


Time now to work out how to mount the screen. Since the mounting rods on the screen would not reach back to the LT bars, which I wanted to retain for the winter mode, I fabricated a couple of 22mm diameter posts that I could mount off the top two bolts that secure the fork tubes.

Mounted like this with new bolts to take account of the thickness of the brackets.

The picture in my head also included an LED daylight running light mounted directly under the headlight and I had shaped the side plates to allow for this. The key factor in finding a suitable light was the width between the headlight mounting plates, approximately 210mm.
I eventually found a cheap set made by our Chinese friends as a test of concept and I expect to replace it with a quality unit when I can find one.
With no fairing bracket to support the horns one of them needed to be relocated behind the radiator on the right hand side, exactly the same as I did on the K75 project. It's a single horn bike in summer mode.
The K100 radiator shroud went straight on once I had mounted the two rubber blocks onto the threaded inserts on either side of the radiator. These mounts were available from Motorworks and I think they were called "stirrups" from memory.

Note the white patch on the lower edge of my tank? I had to have it welded up for the usual leak while this project was going on.
One small challenge that popped up in fitting the radiator shroud is that the K1100 air intake snorkel is different to the K100 so won't fit behind the shroud ...... and guess what! the hole in the airbox where the snorkel fits is slightly bigger on the K1100 ..... damn!
So I got hold of a K100 snorkel (thanks Tom) and then found a piece of rubber edging to fit around the inside edge of the airbox allowing the K100 snorkel to pop in securely.
This bike is a headlights on all the time model and I wanted the headlight to be off when the Daylight Running Light was on. This I achieved by using a triple pole relay to open the circuits to the Hi and Lo beam relays and the park light when the DRL was switched on via a standard BMW Hazard light dash switch with the Hazard icon changed to a Fog Light emblem.
Looks like this.

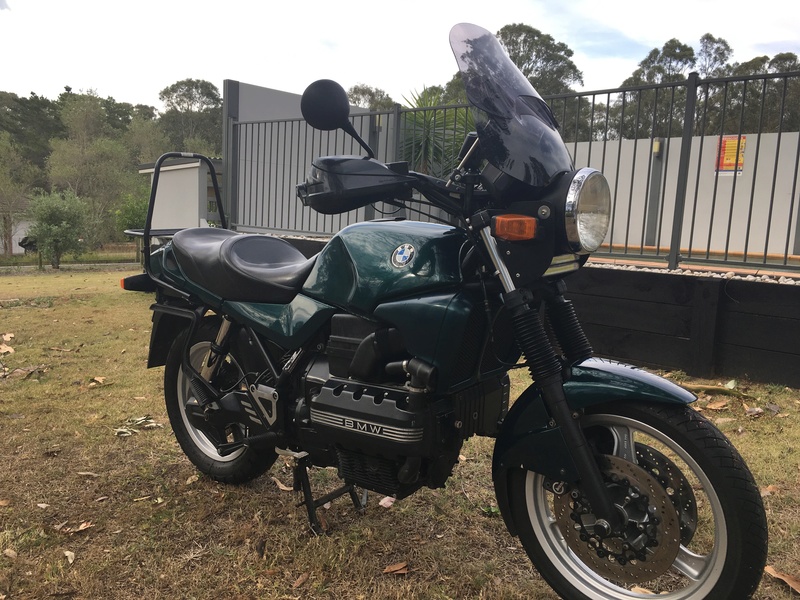
A bit of hand protection in the form of BarkBuster Storms and a couple of little brackets needed to mount a pair of K75 mirrors and it was ready for it's inaugural trip to Phillip Island in good company with Waz on his R1100.

A nice looking pair of BMW 1100s, pity about the owners.


Left side

Right side
So I best get the whole lot off and contemplate some repairs. Well the situation didn't get any better once the fairing was off ......... I'm sure that brass threaded insert and chunk of fairing material in my hand should be attached to the inside of the fairing.

There were a number of other cracks on the inside as well, I guess a testament to the 150,000km on what passes for regional roads in Oz and my "follow the road less travelled" approach to touring this great country.
A passing comment from my dearest as she walked past the stripped K1100 sitting on the apron in front of my shed that "it looks a lot better with all that stuff off it" started the brain ticking over. Since it would take me a while to repair the fairing and bracket while attending to all the other things in life, maybe I should set the K1100 up so that it can be naked for most of the year (when it's warm to hot here in Oz) but be able to re-install the LT fairing for those mid winter trips to the mountains.
I had seen a photo of a naked K1100 in Europe sporting a MRA Vario windscreen when I had been researching windscreens for my other two bikes and in fact have them fitted. This K1100 photo was to be my inspiration, thanks Olaf Kunde wherever you are.

Having already built my own headlight mounting for my naked K75 project I planned to use the same approach, which is to fabricate a backing plate that is securely mounted to the triple clamps and then cut out side plates that attach to it for supporting the headlight and indicators.
One difference on the K1100 to the K75 is that only the top triple clamp has threaded holes where a backing plate can be secured.

My solution for this was to use the two 6mm bolts in the top clamp and then fabricate two C shaped clamps that would clamp the lower portion of the backing plate to the fork tubes.

Which ends up looking like this.

To mount the instrument cluster I used a bracket from a K100RT instrument set and bolted it to the cross bar on the backing plate. Locating the instruments had been the determining factor for the dimensions of the backing plate.

While working on these ideas I searched for one of the round headlights in a metal shell and also a set of naked K100 radiator shrouds. I managed to get the radiator shrouds on fleabay USA and the headlight from Victoria (expensive !!).
Since I wanted to be able to change to the fairing mode for winter I had the challenge of what to do with the relays and wiring that lived in the fairing. With lots of measuring and separating wiring from the original looms and re-wrapping it I found places for it all to be located on the backing plate then welded in a number of small tabs to screw the relays to.
Now it was onto the side plates to mount my headlight and indicators using my tried and proven method of working with MDF or plywood until I was happy with the shape then turn it into aluminium.


Time now to work out how to mount the screen. Since the mounting rods on the screen would not reach back to the LT bars, which I wanted to retain for the winter mode, I fabricated a couple of 22mm diameter posts that I could mount off the top two bolts that secure the fork tubes.

Mounted like this with new bolts to take account of the thickness of the brackets.

The picture in my head also included an LED daylight running light mounted directly under the headlight and I had shaped the side plates to allow for this. The key factor in finding a suitable light was the width between the headlight mounting plates, approximately 210mm.
I eventually found a cheap set made by our Chinese friends as a test of concept and I expect to replace it with a quality unit when I can find one.
With no fairing bracket to support the horns one of them needed to be relocated behind the radiator on the right hand side, exactly the same as I did on the K75 project. It's a single horn bike in summer mode.
The K100 radiator shroud went straight on once I had mounted the two rubber blocks onto the threaded inserts on either side of the radiator. These mounts were available from Motorworks and I think they were called "stirrups" from memory.

Note the white patch on the lower edge of my tank? I had to have it welded up for the usual leak while this project was going on.
One small challenge that popped up in fitting the radiator shroud is that the K1100 air intake snorkel is different to the K100 so won't fit behind the shroud ...... and guess what! the hole in the airbox where the snorkel fits is slightly bigger on the K1100 ..... damn!
So I got hold of a K100 snorkel (thanks Tom) and then found a piece of rubber edging to fit around the inside edge of the airbox allowing the K100 snorkel to pop in securely.
This bike is a headlights on all the time model and I wanted the headlight to be off when the Daylight Running Light was on. This I achieved by using a triple pole relay to open the circuits to the Hi and Lo beam relays and the park light when the DRL was switched on via a standard BMW Hazard light dash switch with the Hazard icon changed to a Fog Light emblem.
Looks like this.

A bit of hand protection in the form of BarkBuster Storms and a couple of little brackets needed to mount a pair of K75 mirrors and it was ready for it's inaugural trip to Phillip Island in good company with Waz on his R1100.

A nice looking pair of BMW 1100s, pity about the owners.

__________________________________________________
Gaz
1990 K75 6427509; 1987 R80G/S PD 6292136; 2010 G650GS ZW13381;


