BMW K bikes (Bricks)


You are not connected. Please login or register

Go to page : 1, 2, 3  Next

View previous topic View next topic Go down  Message [Page 1 of 3]


1Back to top Go down   My K100 Cafe racer project story Empty My K100 Cafe racer project story Fri Sep 09, 2011 3:34 am

rbarrero

avatar
active member
active member
Hi all - I'm building a K100 cafe racer and i figured I would give back to the community by posting my progress with text and lots of pretty pictures. This is my story:

So I've been thinking about building a cafe racer ever since I laid my eyes on an old Ducati on the road a few years back and have always wanted a cafe racer bike since. I went to a Triumph/Ducati dealer in SoCal and test rode a Thruxton but it felt like a toy compared to the Ducati Monster I ended up buying. I tweaked the Monster and made it look like a cafe racer, but I still kept eying true cafe racers and waiting for the moment to be able to make the investment.

A year or two back I went to a bike show and came across a few BMW cafe racers and I absolutely loved them! The airheads truly make a great cafe bike, but still, I couldn't afford it quite yet. Cafe Racer magazine also had some cool bikes, mostly Japanese, but so many ideas in it , so it became my monthly reminder to get a cafe bike.

I then one day I came across a K100 for sale on LA's craigslist (https://www.youtube.com/watch?v=PUulywVf_6c) and I totally fell in love! After talking to the builder, he told me bits of his story and I was inspired. I couldn't afford to buy his, but I never let go of the idea of making one.

Forward to two months ago when I laid down my Duc and the insurance totals it. Sad day, but my time was up and I healed my cuts and bruises. It's funny how going down screws with your head, but I realized it was time to get back on the bike... the one I always wanted to build. I had to literally argue with the insurance to get the most for my investments on the duc, but it was totally worth it because I was already in the green on the loan and the payoff would be enough to buy a relatively cheap bike and also afford the customizations for the cafe build.

Like fate, a 1985 BMW K100 with only 4,500 miles showed up craigslist and I was able to snatch it with some patience and good negotiating. Negotiation skills are totally underrated, by the way. Truth be told, I did test drive a few airheads, triumphs and jap bikes. But those 70s bikes require a lot more maintenance and some don't have proper disc brakes! Gotta have my disc brakes - none of this drum braking through the canyons here in LA. Plus, the K100 is known for its reliability and it had enough modern features that made me believe it was a good platform for the cafe... plus someone had done it before, so why not me?

In addition, it was in absolutely perfect condition (never driven, garaged) with all the maintenance done. What else could I ask for? Cafe racer, here we come!!

Just so you know, I've finally got all my parts (finally!!) and I've started working, making progress on the bike daily. I will start posting pictures of my progress and also detailing the many issues I've come across and resolved. Parts lists will also be included.

Tomorrow I will post (w/ pics) about the tear down, selling my parts and the new cafe parts selection. Until then, I leave you with the only picture I took of the "before" K100.

Thanks,

Rafael

My K100 Cafe racer project story Photo


Last edited by rbarrero on Mon Apr 16, 2012 9:52 pm; edited 1 time in total


2Back to top Go down   My K100 Cafe racer project story Empty Re: My K100 Cafe racer project story Fri Sep 09, 2011 3:47 am

Guest

avatar
Guest
You're gunna piss some people off because you took that gem of a bike apart but you're gunna make an equal part very happy that yet another K bike is loved and is ridden, just like the person who now owns it wants it. I for one look forward to your report. Cheers.


3Back to top Go down   My K100 Cafe racer project story Empty Re: My K100 Cafe racer project story Fri Sep 09, 2011 3:48 am

charlie99

charlie99
VIP
VIP
nice looking rt rafael ....good luck

i can see some bling that could be done straight away ....giggles


__________________________________________________
cheezy grin whilst riding, kinda bloke ....oh the joy !!!! ...... ( brick aviator )

'86 K100 RT..#0090401 ..."Gerty" ( Gertrude Von Clickandshift ) --------O%O
'86 k100 rs.. #######..  "Fred " (f(rame) red ) ( Fredrick leichtundschnell ) - -
bits and pieces from many kind friends across the k100 world ...with many thanks ..
1987 k100rs ########   "Red"  - (red sports rs TWB style )
1989 K100rt #009637   "Black Betty"  (naked rt ala Nigel , now sporting an rs main fairing )
    

4Back to top Go down   My K100 Cafe racer project story Empty Re: My K100 Cafe racer project story Fri Sep 09, 2011 7:24 am

col

col
Life time member
Life time member
i like your idea and look forward to hear how the build goes who knows might be able to pinch some ideas in the future
col


__________________________________________________
1991 k100lt "the enterprise"
    

5Back to top Go down   My K100 Cafe racer project story Empty Re: My K100 Cafe racer project story Fri Sep 09, 2011 8:02 am

pjjms

avatar
Silver member
Silver member
I look forward to progress reports Rafael. One day, when I get some spare time (like thats going to happen), I would love to get rid of all the plastic on my RT. Its great to ride, but it still freaks me out when I get a bit keen on a twisty road and stick my knee out only to collect the fairing.


6Back to top Go down   My K100 Cafe racer project story Empty Re: My K100 Cafe racer project story Fri Sep 09, 2011 9:14 am

blaKey

avatar
Life time member
Life time member
"You're gunna piss some people off because you took that gem of a bike apart"
Your bike Rafael, you can do what you like!

Just the opinion of one of the one pissed-off people! Very Happy


__________________________________________________
Neil
K100RS 1986 RED!

Dress for the ride and the potential slide.
    

7Back to top Go down   My K100 Cafe racer project story Empty Teardown and cafe parts Sun Sep 11, 2011 3:54 am

rbarrero

avatar
active member
active member
Sorry for no update yesterday… I took the wife and baby to Disneyland for dinner and fireworks. Smile

Back to the story!

I probably waited about a week before beginning the teardown. The ride home was all I'll remember of the original bike… it was a nice, comfortable and a smooth ride. I can see why people buy these bikes for long road trips - surely the seat itself is nicer than my office chair… so BMW/Corbin did something right!

I didn't want to ride it after I made it home though… I felt it would be too tempting to just leave it as-is and get complacent. My thought was: Don't ride it until it's done. If I start, I'll have absolutely no choice but to move forward. And that's exactly what I did.

So a week had passed and it just gave me some time to think about the whole thing. I found a great article written by Drake Smith about a K75rt fairing removal that I used a loose guide (http://www.ibmwr.org/ktech/rt-fairing/k75rt_fairing.shtml). The process was very very similar but a little different in some areas because we had differing fairings and components. All in all, it was relatively easy job and basically used a 10mm wrench, allen wrenches, and a phillips screwdriver for the whole thing… it was very easy all in all. I payed very close attention to parts, bolts, brackets and mounts because I would be selling all these good parts online.

I won't go into much detail about the teardown because it was actually very easy. No tricks, snags or drama in this part... just common sense and uncomplicated. The front fairing removal was probably close to an hour with keeping things organized and being very methodical. After that, I went freestyle and started removing the alarm, the tail section, rear inner fender and the side fairings. After two hours, the bike was naked:

My K100 Cafe racer project story IMG_0304

My K100 Cafe racer project story IMG_0305

My K100 Cafe racer project story IMG_0306

So the first thing I noticed... there's a nasty bracket/plate holding down the tank in the crotch area of where one would sit. It rides the width of the frame there and takes up about an inch of sitting room! It wasn't a problem before, but I can see it getting in the way for a cafe seat. It doesn't make an excuse for it's own space and BMW made sure the mounts for the bracket were sturdy and strong and elevated off the frame. Going to have to cover that up with upholstery!!

The second thing I noticed - My feet COMPLETELY touch the ground. The original seat was massive and comes up really high to meet the tank. I also purchased some lower profile tires (read below) so I'm feeling much better about my stance and balance.

In general, the bike didn't look "cafe" at all naked. Not even that pretty after the teardown... I got concerned, but being naked is just a small part of the cafe build - I still need to get all the cafe bits installed. The next thing was to buy my parts... err, I mean, decide on my cafe parts, then buy.

Expenditures for the project were many, but luckily the bike has, mostly, paid for its own build. I was able to sell all the fairings to a dear forum member (CommanderKewl) and the rest to some other people out there on the interweb. Craigslist and Ebay have been good to me! With that influx, I was able to afford all my parts and keep the wife at bay... not happy, at bay. Smile One great part of a build project, I think, is getting all your parts - it's like Christmas or something. Then getting them all together, in front of you, separately, and envisioning the goal.

For me, bike parts are a great topic... love going at it with my buddy and discussing ad nauseam on the subject. Fun stuff. Cafe parts are iconic, I think. Clubman handlebars, a classic big bulb headlight, and then there's the seat. Can't forget about the mirrors... huge style points for retro mirrors. Everything has to be retro for my build! But there's soo many choices!! I probably spent two weeks researching parts, vendors, prices, etc.

Here's my 1st list:
- Tires
- Clubman handlebars
- Grips
- Mirrors
- Headlight
- Headlight bracket
- Turn signals (front and rear)
- Brake light
- Speedometer and Tachometer
- Seat and seat pan
- Exhaust
- License plate holder
- Fork gaiters

What I found:

EMGO is THE manufacturer of classic motorcycle parts for Japanese and English bikes. They are a big chinese manufacturer and everyone under the sun is reselling their parts.

There are local builders (everywhere) here in LA who do cafe bikes. These guys sell parts they make or that they buy from manufacturers. It's in your best interest to visit these guys and see what they're doing and what they have. I actually talked to the guy who built the k100 cafe bike that's on youtube and visited his shop. Gleaned a lot of ideas and purchased a key part on my bike from him. Also a really nice guys and sells parts and bikes off CL.

I really wanted to find a one-stop-shop for my cafe parts but I had to split things up because of taste, cost and availability. Dime City Cycles do have everything from EMGO, but I had to stray for a few things which I found cheaper elsewhere, or closer! Amazon has a ton of parts now. I bought my Bridgestong Battlax 45s from a tire store there, and my retro license plate holder was also from amazon ($30 cheaper than DCC). I bought my fork gaiters from kbikeparts.com and headlight brackets of ebay... although I could have bought them at dime city cycles in retrospect.

Here's my 2nd list:
- Tires: Bridestone Battlax 45 (Front: 110,80/18, Rear: 130,80/17)
- Clubman handlebars - "T" style (the EMGO clubman handlebars did NOT work for me)
- Grips - retro style with bar ends
- Mirrors - napolean style.
- Headlight - euro 7" inch black with chrome
- Headlight bracket - flat black with attl. holes for mounting signals.
- Turn signals (front and rear) - cateye retro style.
- Brake light - thin, flat and round brake light, retro style.
- Speedometer and Tachometer - Acewell 2853
- Seat and seat pan - BMW Knoscher seat for airhead. Custom build by AirTech.
- Exhaust - 17" reverse cone muffler.
- License plate holder - retro, side mount.
- Fork gaiters - original K bike gaiters.

Picture of my parts:

My K100 Cafe racer project story IMG_0374

Each one of the above parts could be a topic unto itself... some of the work, effort and research that goes into each is very time consuming. Like the handlebars... bought two, picked the second one because of the feel. Same with the headlight, bought two because of the style difference and decided on the original one.

I will discuss the parts tomorrow and show you the pics of the build so far in my next post!

Spoiler alert: It sure does look like a cafe bike now! Smile


8Back to top Go down   My K100 Cafe racer project story Empty Re: My K100 Cafe racer project story Sun Sep 11, 2011 4:58 am

blaKey

avatar
Life time member
Life time member
My K100 Cafe racer project story Lurker


__________________________________________________
Neil
K100RS 1986 RED!

Dress for the ride and the potential slide.
    

9Back to top Go down   My K100 Cafe racer project story Empty Re: My K100 Cafe racer project story Sun Sep 11, 2011 9:36 am

Oldgoat

Oldgoat
Life time member
Life time member
Oh, man THIS is going to be good!! My K100 Cafe racer project story 723598 Beautiful color btw.


OG


10Back to top Go down   My K100 Cafe racer project story Empty Re: My K100 Cafe racer project story Sun Sep 11, 2011 2:38 pm

g35corona

g35corona
Silver member
Silver member
Excellent rbarrero! I'm looking forward to following this one.


__________________________________________________
Bob

;BMW;

ex:1986 K100 RT Vin #0091835

2012 R1200 GS
    

11Back to top Go down   My K100 Cafe racer project story Empty Re: My K100 Cafe racer project story Sun Sep 11, 2011 3:27 pm

BIG D

BIG D
Life time member
Life time member
Cool


A gem of a colour and a cafe racer, gonna be a good one rbarrero,

pudding basin helmet at the ready Laughing


BIG D


12Back to top Go down   My K100 Cafe racer project story Empty Re: My K100 Cafe racer project story Sun Sep 11, 2011 4:44 pm

88

88
Life time member
Life time member
Wish my frame was as clean as that,,,then I wouldn't need to strip nothing!


Good luck with the project, I'm dying to see the outcome.


88KE


__________________________________________________
My K100 Cafe racer project story Ir-log1188....May contain nuts!My K100 Cafe racer project story Ir-log11

"The world is a book and those who do not travel read only one page." - St. Augustine from 1600 years ago & still true!

K1 - 1989 - AKA Titan (unique K1/K1100RS hybrid by Andreas Esterhammer)
K1100RS - 1995. AKA Rudolf Von Schmurf (in a million bits)
K100RS - 1991 AKA Ronnie. Cafe racer project bike
K75RTP - 1994
K75C - 1991 AKA Jim Beam. In boxes. 
K1100LT 1992 - AKA Big Red (gone)
K100LT - 1988 - AKA the Bullion brick. Should never have sold it.
    

rbarrero

avatar
active member
active member
My wife finds it odd I spend this time at night writing up what I've done on the bike... She says, Why? Who reads it? She won't get it, but part of me just wants to download this information from my head and into this here post as quickly as I can. Get it out into the internet so riders/enthusiasts can gather ideas and learn from my experience. Hope it all finds you well and safe.

So Saturday was a huge day for me! No compromises, no outings and no nonsense - just me and the bike. Liverpool losing to Stoke was the only downer, but soon forgotten when I came into the garage and saw my other red beauty. I had been waiting for parts for what seemed like an eternity! I made one big order from DCC (Dime City Cycles) and the rest came from various online vendors around the country. The less interesting bits arrived first - gaiters (ok), then the license plate holder (nice), headlight brackets (cool) and then I had one big delivery on Friday with absolutely everything else (OMG!). It really felt like Christmas... except there was no tree, it was about 100 degrees out, and the green tree was my greenish door. Smile

With the wife out of the house for the day, I blasted my favorite classic rock to channel some of the 60s energy and get that working into the bike. Lots of Zepellin, Doors, and old surf music. First part I had to tackle was the handlebars... Here's my handlebar info:

Handlebar Research:
I wanted clip-ons to give me that aggressive riding position I love so much. As I found out, the fork diameter on the K100 is 41.3mm. What the heck!? Not 41mm, not 42mm, just 41.3mm. So that three tenths of a millimeter totally screws up my plans for clip-ons because hardly anyone makes these odd sized clamps. There are generic handlebars made in China that only go up to 38mm or so. Then you have tier two manufacturers like Vortex that make them in my range, and then you have some high end ones like Tarozzi or Rizoma which also make them in my range. Great, right? Not so much. They don't make 41.3mm clip-ons because hardly anyone uses clip-ons on BMWs that had 41.3mm forks. I called Fast from the Past because they import Tarozzi clip-ons, and they suggested I try the 42mm clip-ons with shims. I'd have to use a single .7mm (which doesn't exist, but .8mm does), or multiple shims (.2mm + .5mm). The clip-ons are about $120 plus shipping and the precise shim material is about $40 for an entire sheet. Expensive!! There is some benefit to clip-ons - raising the forks is becomes easier, clamp area on the triple tree can be used for something else, aesthetics... but too costly.

I did find ONE place that sells Profi clip-ons, which are specifically made for our BMWs, and that's "Spec 2" here in LA. However, if you call, some grumpy old man will answer the phone and tell they are too expensive before he tells you anything else. "How much?", I said. "$175 bucks and I've only sold one pair in twenty years. You going to make it two?" Nope, but I'm not one bit surprised with that price and attitude. Their website hasn't been updated in over 12yrs, so go figure. Here's the link if you want to take a look anyway: http://www.spec2.com/clips.html#clips

So I ditched the clip-on handlebars idea and decided to just go with the standard EMGO clubman handlebars (http://www.dimecitycycles.com/vintage-cafe-racer-caferacer-bobber-brat-chopper-custom-motorcycle-handlebar-parts-chrome-clubman-handlebars-23-12538.html). Cheap and proven.

Removing the grips, controls and handlebar was pretty easy - nothing to it. I noticed there was no glue underneath the left hand grip. Anyone verify if this is just me?

Planting and centering the new clubman bars was easy and I tightened the clamp just enough so I could get a feel for the ride position. They looked a little small at first glance from the seat. Secondly, I was stretched a little more than expected because of their drop. If I'm honest, I didn't like it... but maybe it's like a new haircut, you have to adjust to in order to appreciate it? Another thing... the emgo clubman bars come a little too close to the k100's tank. Not super close, but I could tell the bars were too small for the bike and handling seemed hard.

Then it was time to slide the controls in... boy was this a chore. The left side was tough and needed a lot of rotating and pushing to slide in. Once the I got one inch past the clamp, it went easier all the way up the bar. The right side was an utterly difficult and intense task that ended in utter failure. I went to bed that night pissed off and looking for ideas on how to get those controls on.

The next day I rang Steve who's in Northridge and built a nice k100 cafe racer. I went over to his garage and purchased *another* clubman style handlebar (not emgo) and a 6 3/4" chrome headlight that looked cool. The new bars had a more relaxed riding position, were wider and a little longer... a lot like the Lossa Engineering bars (http://www.dimecitycycles.com/vintage-cafe-racer-caferacer-bobber-brat-chopper-custom-motorcycle-handlebar-parts-lossa-engineering-chrome-clubman-handlebars-le-club-c.html) but only cost me $55.

After I placed the new bars into the clamps and tested them out, I realized these would be perfect! So so glad I found these bars! Same issue with the controls though - way too difficult to slide the controls in. So I posted my question here (http://k100rt.aforumfree.com/t2604-help-installing-new-handlebars) and got some wise feedback.

Turns out that the BMW bars are 22m and not 7/8" (7/8" is 22mm). In addition to the 7/8" size, there is chrome at the surface which adds its own thickness and causes interference. So off to the hardware store it was to buy a very coarse (10), round paint stripper and attached it to my drill. It worked like a dermal tool and I shaved off enough to have the right side controls slide in ever so smoothly. Grips were also done, used rubbing alcohol to slide them in.

Here is a before shot of the original bars:

My K100 Cafe racer project story IMG_0378

Here is the after:

My K100 Cafe racer project story IMG_0383

My K100 Cafe racer project story IMG_0385

Headlight

Even though there are many options for each component, the headlight was a simple pick for me. Once I saw it, I knew it was the one. I already had the image in my head and it needed to be a big round headlight… like the one used on my old Monster. There are oval types, british (lucas style) and I ended up with a metric style one that fits the bike really well. One thing to keep in mind is the sizing and how it relates to the forks and headlight brackets. I used a 7" headlight in the end, but played with a 6" one as well… the width between the forks (from center to center) is 7", so a 7" was appropriate and more importantly, looked good to me over the smaller one.

The headlight bracket I bought was a $20 set made by emgo and they have three holes in the side for fitting the the headlight and additional pieces as well. These brackets were intended for japanese bikes with smaller forks, so I had to use some brute force and gently pry them open for a proper fitting. Then I had to round it a bit with a hammer using a sturdy table edge. Careful not to scratch these since they are exposed. I also had to buy new, larger screws to make up for the 5-8mm difference. Tightening them well sorted rest of the fitting.

Here's what the bracket looks like:

My K100 Cafe racer project story IMG_0400

Here's what the headlight + bracket look like:

My K100 Cafe racer project story IMG_0401

I recall reading somewhere that the bracket is intended up to 43mm use, so it still does work on these bikes with slight modification. There is another pair I really like that fit large forks and are chrome with rubber inserts, but I actually like these a lot now.


Speedometer / Tachometer

I wanted a speedo and tach for the bike. Steve told me he went without one, but I believe it would feel unfinished for me... so I found a few good alternatives to the stock speedo: Acewell, Koso and Vapor. There are others out there, but these seemed well rounded and used by other people around the internet. The Acewell 2853 is $200 and includes tach and speedo in one, using a nice lcd which flips depending on view. Same with Vapor, but costs $300 when all is said and done. The Koso people have speedos and tachs, separately which go for about $130 each and I would need to figure out a clean mounting solution for two units. Koso makes a really nice motoGP style speedo+tach but costs $350-$400. The Acewell looks retro and has a lot of functionality for what it is... take a look:

My K100 Cafe racer project story IMG_0392

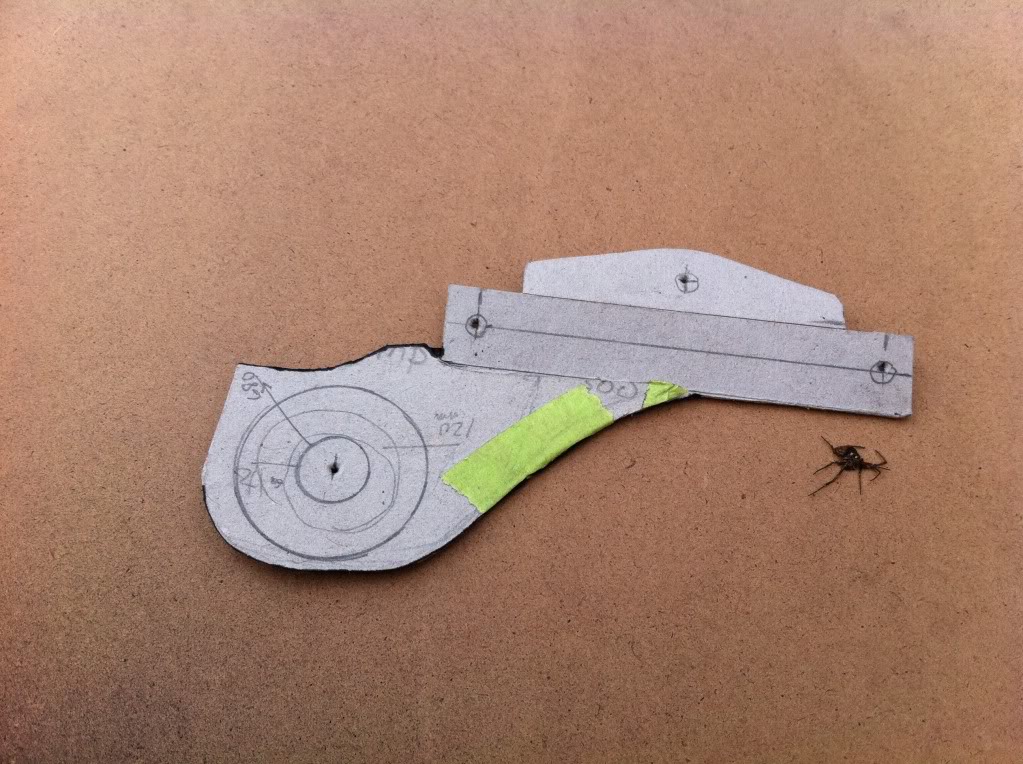
You can laugh at my bracket if you like. Very Happy I drilled some holes into this little plate and put them into the back of the triple tree. I also had to nastily curve the plate and make a center hole for the Acewell speedo. I called a few machine shops in the area and I have some plans to get a custom plate that will suite the speedo and ignition.

So this is what she looks like from the front:

My K100 Cafe racer project story IMG_0405


Mirrors

My Duc had CRG lane-splitters which were very cool, but I wanted something different... I went with the DCC napolean style mirrors. Here they are installed:

My K100 Cafe racer project story IMG_0433

More...

My K100 Cafe racer project story IMG_0425

One more...

My K100 Cafe racer project story IMG_0434

Can you say Cafe?

So maybe you can tell the wiring is hanging down in the front... yeah, I need to do the whole electrical/wiring setup on this baby. The acewell needs to be setup and the blinkers need to be connected as well. I have space in the bucket to hide some wiring, but overall I'm going to have to remove the headlight again and do some soldering and testing for the acewell install. Luckily, someone on an airhead has already done this and I hope to get help from members on this forum... I would appreciate any of you with strong k100 electrical knowledge to lend a hand in offering any wisdom. For example, I can turn the bike on now... but the clutch has to be put in because I'm missing a relay that's normally in the instrument cluster.

So that's all for today folks... My seat arrives tomorrow and I will take pics of that and go into the details of all the neat and interesting points for making an knoscher airhead (from an R100) seat fit on a K100.

Thanks,

Rafael


14Back to top Go down   My K100 Cafe racer project story Empty Re: My K100 Cafe racer project story Mon Sep 12, 2011 5:18 am

Guest

avatar
Guest
Schweet! I'd call that minimalist. It needs a pipe, all cafe's have a pipe. Goodonya.


15Back to top Go down   My K100 Cafe racer project story Empty Re: My K100 Cafe racer project story Mon Sep 12, 2011 5:23 am

geordnz

geordnz
Silver member
Silver member
Looking very impressive. I bet a lot of us wish we started off with a bike in suck good nic' !! Geord' from NZ


16Back to top Go down   My K100 Cafe racer project story Empty Re: My K100 Cafe racer project story Mon Sep 12, 2011 5:28 am

Guest

avatar
Guest
Pity about the clip-ons. I use Vortex clip-ons on my old R100 Airhead cafe with K75S 41.3mm front forks. I got the ones that fit the early F650 'Strada'. They fit right, no shimming required, and look the biz.


17Back to top Go down   My K100 Cafe racer project story Empty Re: My K100 Cafe racer project story Mon Sep 12, 2011 5:32 am

blaKey

avatar
Life time member
Life time member
Love the big headlight! Looks like a freakin' train coming at ya!
Great work Rafael.


__________________________________________________
Neil
K100RS 1986 RED!

Dress for the ride and the potential slide.
    

18Back to top Go down   My K100 Cafe racer project story Empty Re: My K100 Cafe racer project story Mon Sep 12, 2011 5:38 am

charlie99

charlie99
VIP
VIP
sweet job !!!


__________________________________________________
cheezy grin whilst riding, kinda bloke ....oh the joy !!!! ...... ( brick aviator )

'86 K100 RT..#0090401 ..."Gerty" ( Gertrude Von Clickandshift ) --------O%O
'86 k100 rs.. #######..  "Fred " (f(rame) red ) ( Fredrick leichtundschnell ) - -
bits and pieces from many kind friends across the k100 world ...with many thanks ..
1987 k100rs ########   "Red"  - (red sports rs TWB style )
1989 K100rt #009637   "Black Betty"  (naked rt ala Nigel , now sporting an rs main fairing )
    

19Back to top Go down   My K100 Cafe racer project story Empty Re: My K100 Cafe racer project story Mon Sep 12, 2011 9:48 am

Inge K.

Inge K.
VIP
VIP
rbarrero wrote:For example, I can turn the bike on now... but the clutch has to be put in because I'm missing a relay that's normally in the instrument cluster.

Here is one solution for this "problem".

Inge K.


20Back to top Go down   My K100 Cafe racer project story Empty Re: My K100 Cafe racer project story Mon Sep 12, 2011 4:21 pm

rbarrero

avatar
active member
active member
@Inge K. - thanks for the info, I'm going to try this out.


21Back to top Go down   My K100 Cafe racer project story Empty Re: My K100 Cafe racer project story Mon Sep 12, 2011 5:49 pm

charlie99

charlie99
VIP
VIP
great bit of information inge ....


__________________________________________________
cheezy grin whilst riding, kinda bloke ....oh the joy !!!! ...... ( brick aviator )

'86 K100 RT..#0090401 ..."Gerty" ( Gertrude Von Clickandshift ) --------O%O
'86 k100 rs.. #######..  "Fred " (f(rame) red ) ( Fredrick leichtundschnell ) - -
bits and pieces from many kind friends across the k100 world ...with many thanks ..
1987 k100rs ########   "Red"  - (red sports rs TWB style )
1989 K100rt #009637   "Black Betty"  (naked rt ala Nigel , now sporting an rs main fairing )
    

22Back to top Go down   My K100 Cafe racer project story Empty Re: My K100 Cafe racer project story Mon Sep 12, 2011 9:12 pm

Rick G

Rick G
admin
admin
Nice bike but absolute sacrilege. Seems to me that it is akin to making a panelvan from a formula 1 car.

Could you have used a Honda maybe but it is being done well I'd say.Smile


__________________________________________________
"Man sacrifices his health in order to make money.
Then he sacrifices money to recuperate his health.
And then he is so anxious about the future that he does not enjoy the present; the result being that he does not live in the present or the future; he lives as if he is never going to die, and then dies having never really lived."   Dalai Lama


Bikes 1999 K1100 LT with a Big Block 1200
    

23Back to top Go down   My K100 Cafe racer project story Empty Re: My K100 Cafe racer project story Tue Sep 13, 2011 3:16 am

rbarrero

avatar
active member
active member
Hi all - as the title says, my seat arrived today! There really isn't
much left to arrive, except the exhaust from CommanderKewl.


The seat I ordered is called a Knoscher seat. Which is a seat designed
for the airhead frame, not the K100. It's a lovely tail with a roundel
for the BMW logo. I bought this from AirTech and the guys made this in
their shop from a model. Here's what it looks like:

My K100 Cafe racer project story Bmwrss1contact


The Fit

It doesn't fit well currently because the K100 frame is about .5" wider on each side, so the edges of the seat hit the frame instead of slipping over nicely. I will need to do some customization to both the fiberglass and rear frame. I'll be chopping the rear section just enough so the rear section of seat will fit nicely. The frame of the K100 tail section is very rectangular and wider than the round airheads subframes, so apart from just chopping, I also need to make an appropriate metal loop and weld that for proper fitment and frame stability.


Mounting

I'm planning on using the same sort of frame mounts that were used prior, for this seat. Since I'll be doing a tailchop, I will need to weld these new little brackets into the frame. I'm also thinking of welding a thin plate across the bars so I can workout how to mount the tail light and turn signals.

Upholstery

I've only purchased a half sheet of 1", medium grade, closed cell neoprene foam to place on the seat pan while I find a someone who will upholster the seat pan. I ordered the neoprene from here: http://foamforyou.com/neoprene.htm

Here's what the seat looks like currently when I rest it upon the frame:

My K100 Cafe racer project story IMG_0445

My K100 Cafe racer project story IMG_0451

These pictures aren't great because of the lighting, but you get the idea.... have to envision it.

I'm not even close to being done though... this seat is going to take a week or two to sort out. The setup for the speedo will begin shortly as well. The last thing on the list is the reverse cone muffler... I'll need a 4 into 1 collector to get that working, but my buddy CommanderKewl is working on that these days.

My next update will be to report on the wiring the Acewell 2853 to the K100, so check back soon. I've already got my pinouts, just need to do a little mapping and soldering.

Cheers!


24Back to top Go down   My K100 Cafe racer project story Empty Re: My K100 Cafe racer project story Tue Sep 13, 2011 5:39 am

charlie99

charlie99
VIP
VIP
woohoo !!


__________________________________________________
cheezy grin whilst riding, kinda bloke ....oh the joy !!!! ...... ( brick aviator )

'86 K100 RT..#0090401 ..."Gerty" ( Gertrude Von Clickandshift ) --------O%O
'86 k100 rs.. #######..  "Fred " (f(rame) red ) ( Fredrick leichtundschnell ) - -
bits and pieces from many kind friends across the k100 world ...with many thanks ..
1987 k100rs ########   "Red"  - (red sports rs TWB style )
1989 K100rt #009637   "Black Betty"  (naked rt ala Nigel , now sporting an rs main fairing )
    

25Back to top Go down   My K100 Cafe racer project story Empty Re: My K100 Cafe racer project story Tue Sep 13, 2011 8:17 am

88

88
Life time member
Life time member
I saw a secondhand one of those on Ebay -uk, about 2 years ago. My jaw nearly dropped when it made almost £300! but it's a class way to finish off the back end of a cafe racer.. Oh yeah,, lookin forward to seeing her painted.


88KE


__________________________________________________
My K100 Cafe racer project story Ir-log1188....May contain nuts!My K100 Cafe racer project story Ir-log11

"The world is a book and those who do not travel read only one page." - St. Augustine from 1600 years ago & still true!

K1 - 1989 - AKA Titan (unique K1/K1100RS hybrid by Andreas Esterhammer)
K1100RS - 1995. AKA Rudolf Von Schmurf (in a million bits)
K100RS - 1991 AKA Ronnie. Cafe racer project bike
K75RTP - 1994
K75C - 1991 AKA Jim Beam. In boxes. 
K1100LT 1992 - AKA Big Red (gone)
K100LT - 1988 - AKA the Bullion brick. Should never have sold it.
    

26Back to top Go down   My K100 Cafe racer project story Empty Acewell 2853 on a K100 Wed Sep 14, 2011 5:39 pm

rbarrero

avatar
active member
active member
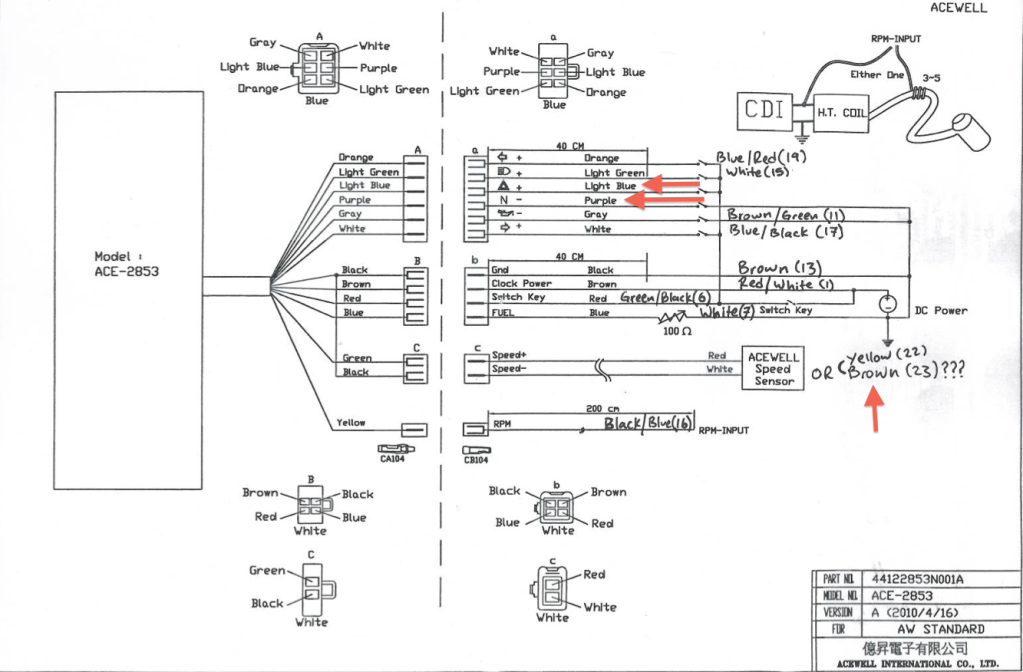
I did some mapping last night based on the K100 pinouts doc I found on the motobrick.com forum, and on the acewell diagram that came with the unit. So below is an image of the acewell wiring diagram with my notes on what I think are the correct wires on the bmw harness.

I would appreciate any verification of what I've written and help determining the hazard and neutral lights. Also, IF it is at all possible to use the internal speed sensor. I can always fallback on magnetic speed sensor included with the unit, but I would rather use internal sensor if at all possible.

I'm operating under the assumption that these are the pinouts on my 85 K100:
1 Red/White Clock Power (other stuff too)
2 Yellow/White Gear Position Switch
3 Yellow/Black Gear Position Switch
4 Yellow/Blue Gear Position Switch
5 Black/Green Starter Switch(Clutch in or gear=0)
6 Green/Black Power
7 White Low fuel lamp
8 Green/Yellow ABS Warning Relay
9 Blue Alternator
10 Violet/black Temp relay
11 Brown/Green Oil light
12 Violet/White Choke indicator
13 Brown Ground
14 White/Blue Bulb monitor
15 White High beam
16 Black/Blue Tachometer
17 Blue/Black Right turn indicator
18 Brown Ground
19 Blue/Red Left turn inicator
20
21 Blue/Green Turn signal cancel on flasher relay
22 Yellow Speed Sensor
23 Brown Ground
24 Gray/Blue Backlights

Here's the acewell 2853 diagram

My K100 Cafe racer project story Acewell-2853_bmw-k100_wiring

Thanks!


27Back to top Go down   My K100 Cafe racer project story Empty Re: My K100 Cafe racer project story Thu Sep 15, 2011 3:51 am

Inge K.

Inge K.
VIP
VIP
Pin 23: Brown, speed sensor.

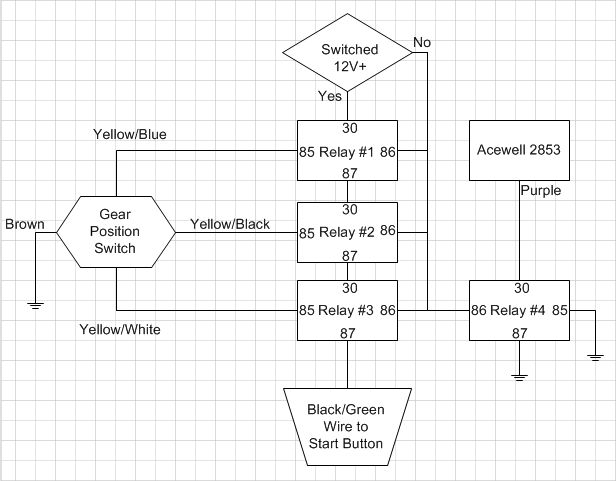
About neutral indicator, add a relay to the previously sendt solution with 3 relays.
Connect 86 between third relay and starter switch, 85 and 87 to ground, 30 to neutral indicator.

Inge K.


28Back to top Go down   My K100 Cafe racer project story Empty Re: My K100 Cafe racer project story Fri Sep 16, 2011 3:40 am

rbarrero

avatar
active member
active member
@Inge K. - You mean like this?

My K100 Cafe racer project story Neutral_solution


29Back to top Go down   My K100 Cafe racer project story Empty Tires and Fork gaiters Fri Sep 16, 2011 4:02 am

rbarrero

avatar
active member
active member
I've been pretty busy this week with work (my day job) and also prepping for a ton of work on the bike this weekend, so I haven't made any progress on the frame and seat portion of the project. That said, there was some low-hanging fruit to take care of - tires and fork boots.

In case anyone wants a specific K bike (k75 in the example) how-to article on this subject, this one isn't bad:
http://www.webbikeworld.com/Motorcycle-technical-articles/fork-gaiters/installing-fork-gaiters.htm

To do this, I did have to take the whole front-end off again which I'm sort of getting used to now... and the electrical setup will require it again as well so I can tidy up all the cabling for the speedo/tach and lighting.

As you can see, installing fork gaiters/boots isn't super trivial because you have to remove the front brake calipers, front tire, fender, fork brace (if you have one) and both forks. That said, it isn't that complex and as long as you have your allen wrenches and torque wrench to make sure you've got the proper tensions set.

Before:
My K100 Cafe racer project story IMG_0455

During (1):
My K100 Cafe racer project story IMG_0456

During (2):
My K100 Cafe racer project story IMG_0457

After:
My K100 Cafe racer project story IMG_0459


The fork gaiters add a very nice look to the bike. It's hard to tell in the pictures with all the cables hanging and no headlight, but it's a great and cheap add-on... probably looks better from a distance.

That's about it for now... I will have an update this weekend or early next week after I chop the tail start figuring out how to make my seat work.

Cheers!

Rafael


30Back to top Go down   My K100 Cafe racer project story Empty Re: My K100 Cafe racer project story Fri Sep 16, 2011 4:11 am

Inge K.

Inge K.
VIP
VIP
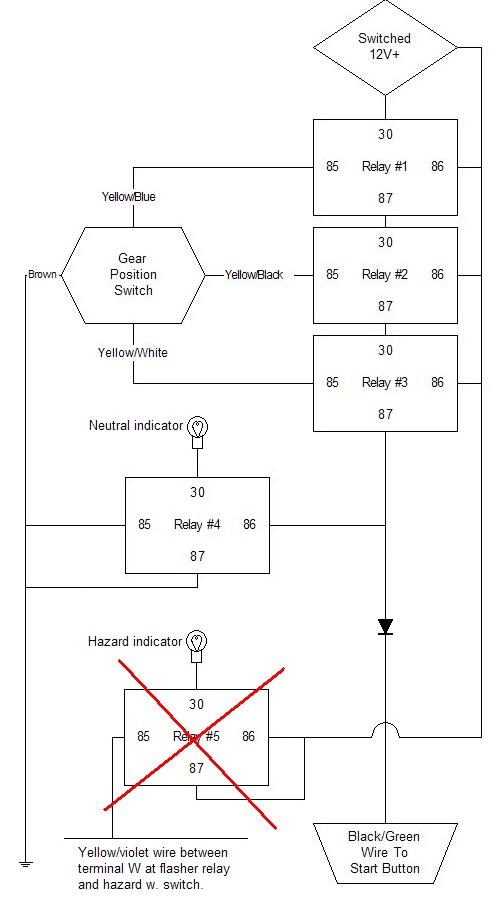
Almost correct, but your neutral indicator would be on at all time.
86 at relay #4 must be connected at 87 on #3.
Here is a solution that also include hazard indicator:
(Easier solution to be found 6 posts down).

My K100 Cafe racer project story Rele1010

Inge K.


Last edited by Inge K. on Sun Apr 01, 2012 9:39 am; edited 3 times in total (Reason for editing : Easier solution 6 posts down.)


31Back to top Go down   My K100 Cafe racer project story Empty Re: My K100 Cafe racer project story Fri Sep 16, 2011 4:37 am

charlie99

charlie99
VIP
VIP
guys ...that looks verry bulky ....i would be thinking some smaller relays attached to a small piece of vero board could minaturize it a lot like about 1/3 the size ...my tip would be to cover the tracks on the back of the board after being soldered up with sticky back velco ....the mating half would then attach to something solid .....tip ....also make room for a couple of 3 mm x 100mm cable ties to hold it all together ...


just a thought from a silly old fart Idea bounce


looking good raf ......


32Back to top Go down   My K100 Cafe racer project story Empty Re: My K100 Cafe racer project story Fri Sep 16, 2011 8:18 pm

rbarrero

avatar
active member
active member
@charlie99 - true, it's not ideal because the standard automotive relays are about an inch cubed, and I am trying to get away from clutter and the big cluster in the first place... But if you have suggestions of saving space with smaller relays then please send your ideas, links or part numbers.

I went to my local electronics shop today here in Pasadena and they have relays for about $7 a piece. How much are these smaller ones? Are they miniature/micro automotive relays?

Cheers!


33Back to top Go down   My K100 Cafe racer project story Empty Re: My K100 Cafe racer project story Fri Sep 16, 2011 8:55 pm

charlie99

charlie99
VIP
VIP
raf im thinking all this can be housed under the tank ...as you only need to send a couple of wires to the guages .

seek your local electronics store and ask their advice to what is local to you ,,,but in the past i have seen and used micro relays about 1/2 inch square....most of them might be spdt (single pole double throw )types ...but not to worry we are only going to use "normaly open" contacts , pick 12 volt operating coil ....ask them about "vero board" basically it is fiber glass board with holes drilled in a regular patern acrross it and underneath it has copper tracks running the length of the board with spacing between ...this would be ideal for carrying a common conductor and wiring off to the next part of the circuit etc etc ....to break the track to a 1/8 drill bit is used to cut the copper away ...a bit of soldering required and some planning .....finish off by "clear protective acrylic spray " to seal the whole deal ....the holes in the board will let you introduce connection cabling to the right places then house in a really small box i guess to keep all the nastys away

um they call it strip board over there http://en.wikipedia.org/wiki/Stripboard

...,,,chose something like 14 strand x .020mm (oops about 22 guage )insulated wire for the external connections


http://www.radioshack.com/product/index.jsp?productId=2062481&CAWELAID=107591283
give me a name of a local electronics store to you ( that has a web page type cataloge ) and ill lookup what i can


34Back to top Go down   My K100 Cafe racer project story Empty Re: My K100 Cafe racer project story Fri Sep 16, 2011 9:36 pm

rbarrero

avatar
active member
active member
Orvac Electronics is the place I went to today. They had 30A, 40A and 70A auto relays but nothing on the small side like you're mentioning. I picked up some waterproof heatshrink tubing and a resistor I'll need.

I did also swing by radio shack, but their component section has been marginalized to a tall chest. They had a 4 relays in stock and were of the normal sized ones... nothing like they offer online.


35Back to top Go down   My K100 Cafe racer project story Empty Re: My K100 Cafe racer project story Fri Sep 16, 2011 9:43 pm

charlie99

charlie99
VIP
VIP
looks like the orvac folks are based around home / simple electronics rather than discret components ...surely you have a "geek" store round there somewhere ....grin


were only looking for a relay to carry a couple of amps .....in fact 1/2 an amp would suffice ....but always better to go a bit larger


if so youll prolly find some kid that could build it up for you too ?


36Back to top Go down   My K100 Cafe racer project story Empty Re: My K100 Cafe racer project story Sat Sep 17, 2011 2:57 am

Inge K.

Inge K.
VIP
VIP
rbarrero!

I did have another look at the wiring diagram, you can leave out relay #5 (hazard).
Instead you can connect your hazard indicator to the blue/white wire running between terminal C at flasher relay and hazard switch.

This wire leaved out on newer switches (~-93), but the wire is still present at the harness connector.

Connector for hazard switch is on the left side under the tank.

Inge K.


Last edited by Inge K. on Mon Jan 16, 2012 11:27 am; edited 2 times in total (Reason for editing : Adding info.)


37Back to top Go down   My K100 Cafe racer project story Empty Re: My K100 Cafe racer project story Sun Sep 18, 2011 8:54 pm

Inge K.

Inge K.
VIP
VIP
If you are going for the micro-relays, this could be an idea.

Inge K.


38Back to top Go down   My K100 Cafe racer project story Empty Re: My K100 Cafe racer project story Mon Sep 19, 2011 6:59 am

Crazy Frog

Crazy Frog
admin
admin
Why don't you use solid state relays?
A solid state relay (SSR) is an electronic switching device in which a small control signal controls a larger load current or voltage. You can find them supporting up to 100Amp. This more than you will ever need.
Check this page for an idea They have AC and DC SSRs.
Here is a picture for an idea, but you can find them even smaller. The advantage is: No mechanical moving parts.
My K100 Cafe racer project story 739px-Solid_state_relay

CF


__________________________________________________
My K100 Cafe racer project story Frog15My K100 Cafe racer project story Logo2101986 k75, 1985 K100rt, 1985 K100rt/EML GT2 sidecar, 1999 K1200lt/Hannigan Astro Sport sidecar.
    

39Back to top Go down   My K100 Cafe racer project story Empty Re: My K100 Cafe racer project story Mon Sep 19, 2011 7:25 am

charlie99

charlie99
VIP
VIP
an excellent idea .....good post bert


__________________________________________________
cheezy grin whilst riding, kinda bloke ....oh the joy !!!! ...... ( brick aviator )

'86 K100 RT..#0090401 ..."Gerty" ( Gertrude Von Clickandshift ) --------O%O
'86 k100 rs.. #######..  "Fred " (f(rame) red ) ( Fredrick leichtundschnell ) - -
bits and pieces from many kind friends across the k100 world ...with many thanks ..
1987 k100rs ########   "Red"  - (red sports rs TWB style )
1989 K100rt #009637   "Black Betty"  (naked rt ala Nigel , now sporting an rs main fairing )
    

40Back to top Go down   My K100 Cafe racer project story Empty Re: My K100 Cafe racer project story Fri Sep 23, 2011 12:18 am

rbarrero

avatar
active member
active member
So the Knoscher seat needed to be highly modified. The tongue plus another 5" had to be cut from the front (and re-added) because of the rise to meet the airhead tank didn't make sense here. The sides also had small edges that wouldn't let it sit flat on the frame, so they needed to be trimmed as well. Once the seat was modified, I could see where I had to chop the frame for a proper fit of the tail's seat with the frame.

The rear frame tube on the K100 is actually a separate piece that slides into and is welded to the main frame at the factory. After cutting the frame and releasing the rear tube, I had my buddies bend the original tube to fit the curvature of the seat. We are now making brackets that will attach to the frame and seat for mounting. It helps to have friends at car design shops. Smile

On the electrical front, I will try some solid state relays from the earlier suggestion by CF. I should be getting some soon.

I'll post pictures this weekend! Cheers!


41Back to top Go down   My K100 Cafe racer project story Empty Re: My K100 Cafe racer project story Fri Sep 23, 2011 4:55 am

judsrs

judsrs
active member
active member
Rafael, awesome work mate My K100 Cafe racer project story 112350 she'll be a right rip snorter!! and what a great read too!!
Thanks for giving us blokes something to read on these long cold nights!

Keep up the great work!


42Back to top Go down   My K100 Cafe racer project story Empty Tail chop and bracket Sun Sep 25, 2011 4:06 am

rbarrero

avatar
active member
active member
Here are the pictures of the tail chop and refit...

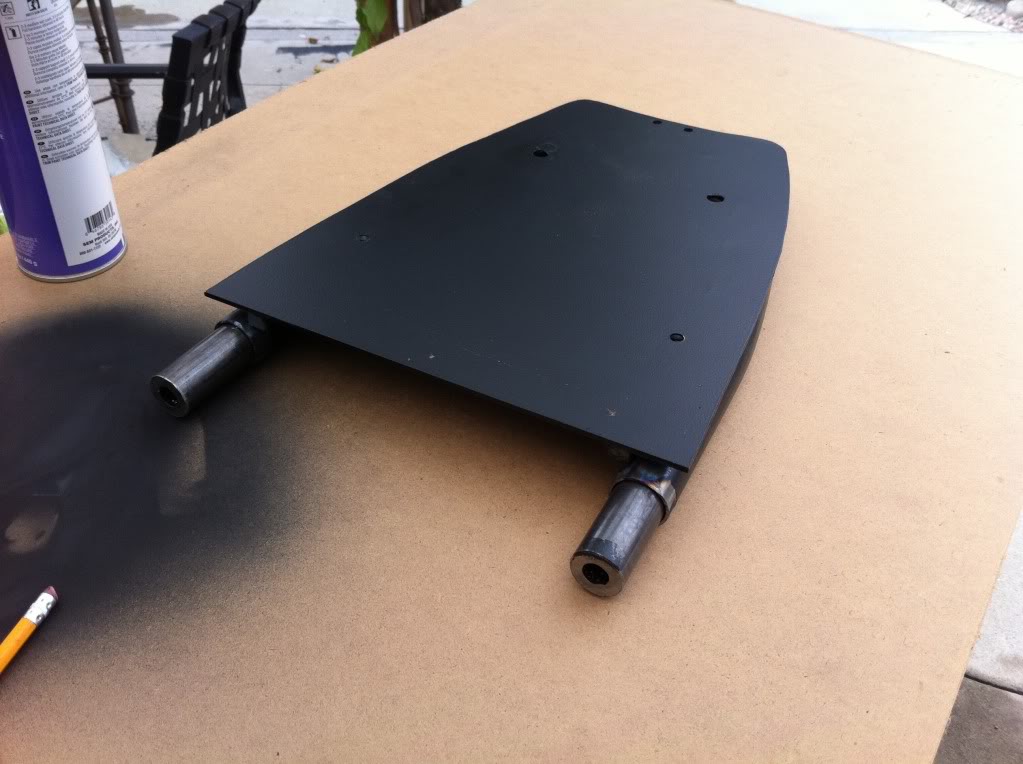
I didn't want to leave the tail chopped and just hanging out in the wind... it's unsafe and could potentially cause issues by leaving the frame as an open system. The rectangular rear bar was removed and modified and made slightly rounder to fit the curve of the seat. You might be able to noticed there is a thick, inner tube we added as a means to reinforce the re-addition of the frame.

My K100 Cafe racer project story B24be8c8

Rear frame piece with bracket:
My K100 Cafe racer project story A35bd5bd

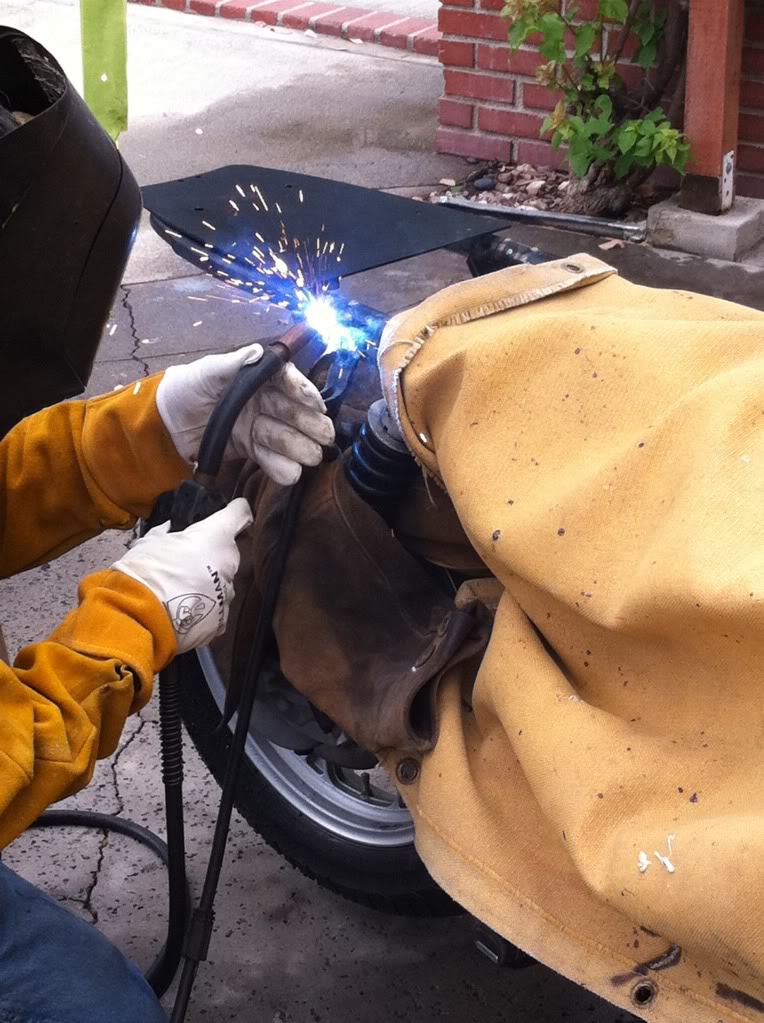
Welding:
My K100 Cafe racer project story 85082ab4

All done:
My K100 Cafe racer project story C8ac221d

With a little black spray paint, it looks original. It's super strong too, I stood on top of that rear part and supported all 165lbs of me! Smile Not that anyone will be standing there ever, but it's for good measure. That rear bracket is needed for securing the seat and also some other things like the tail light.

Cheers!


43Back to top Go down   My K100 Cafe racer project story Empty More body work required... Sun Sep 25, 2011 4:34 am

rbarrero

avatar
active member
active member
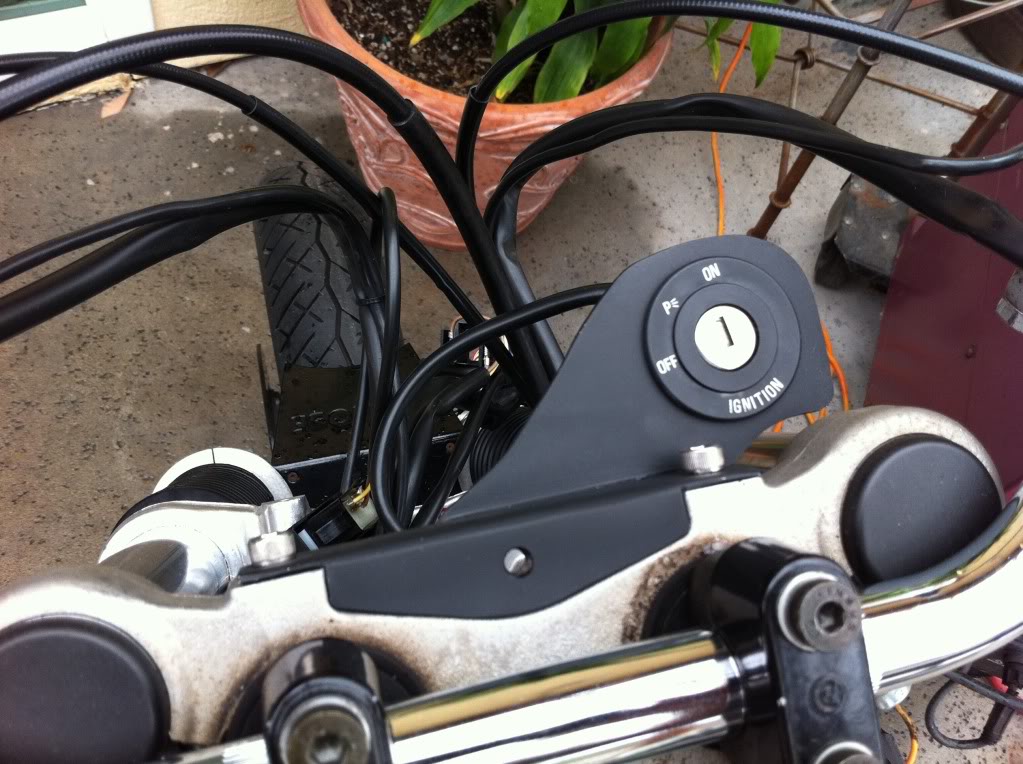
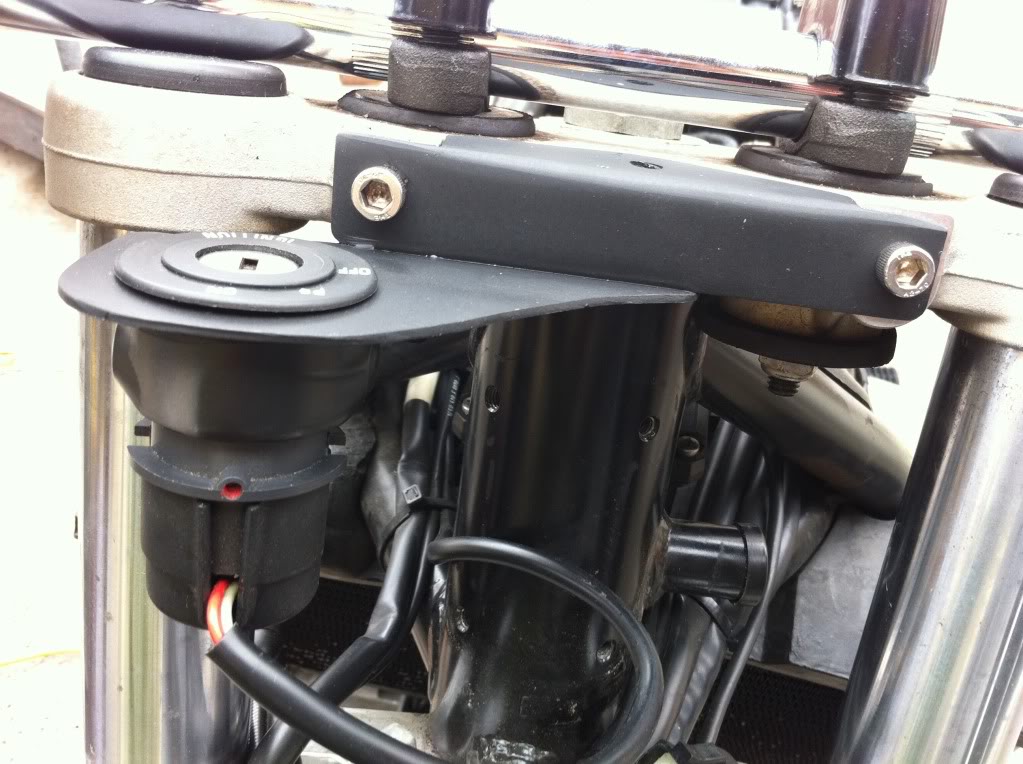
Made some more progress this weekend "under the hood" so to speak, but doesn't look like it yet. First thing to do was install the new bracket for the acewell instrument cluster. Perhaps you remember my makeshift bracket some of you probably laughed at? Well, after a quick design, it's a reality and now installed on the bike. Here are some pictures:

My K100 Cafe racer project story D7f49a95

As you can see below, it's perfect fit and simply sublime... looks like it came from the factory:
My K100 Cafe racer project story C4b54a80

Front:
My K100 Cafe racer project story 96c4b8b9

After the bracket work, it was time to tackle lots of seat issues... so the seat was modified, but now there was fitment issues to deal with as well.

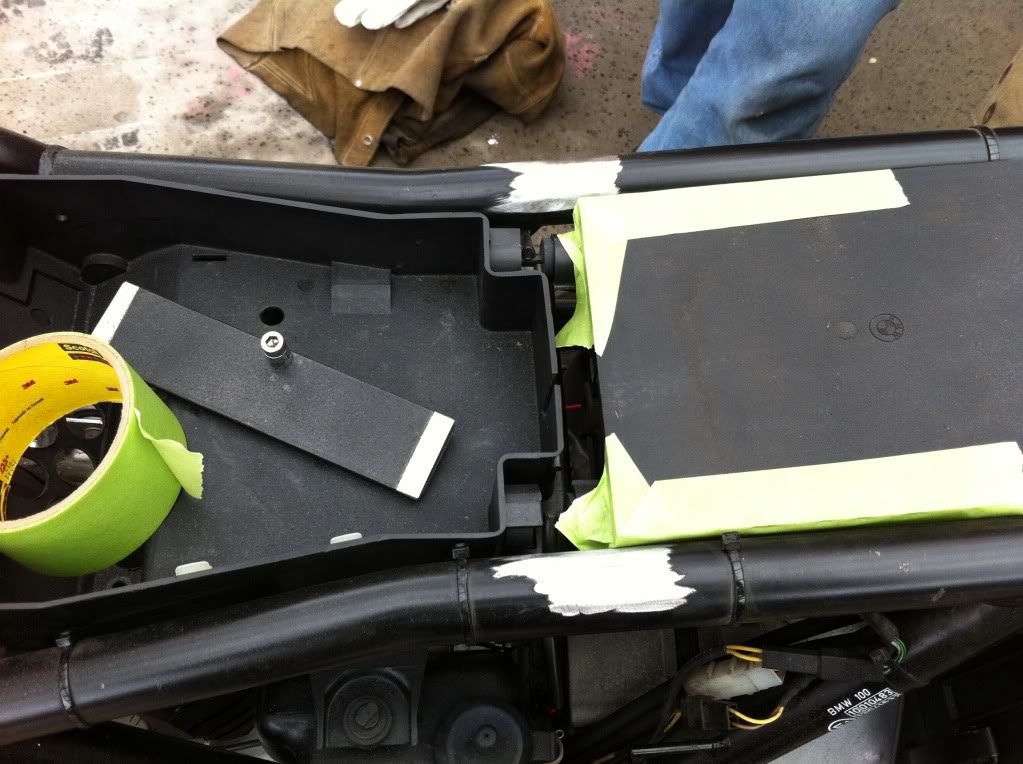
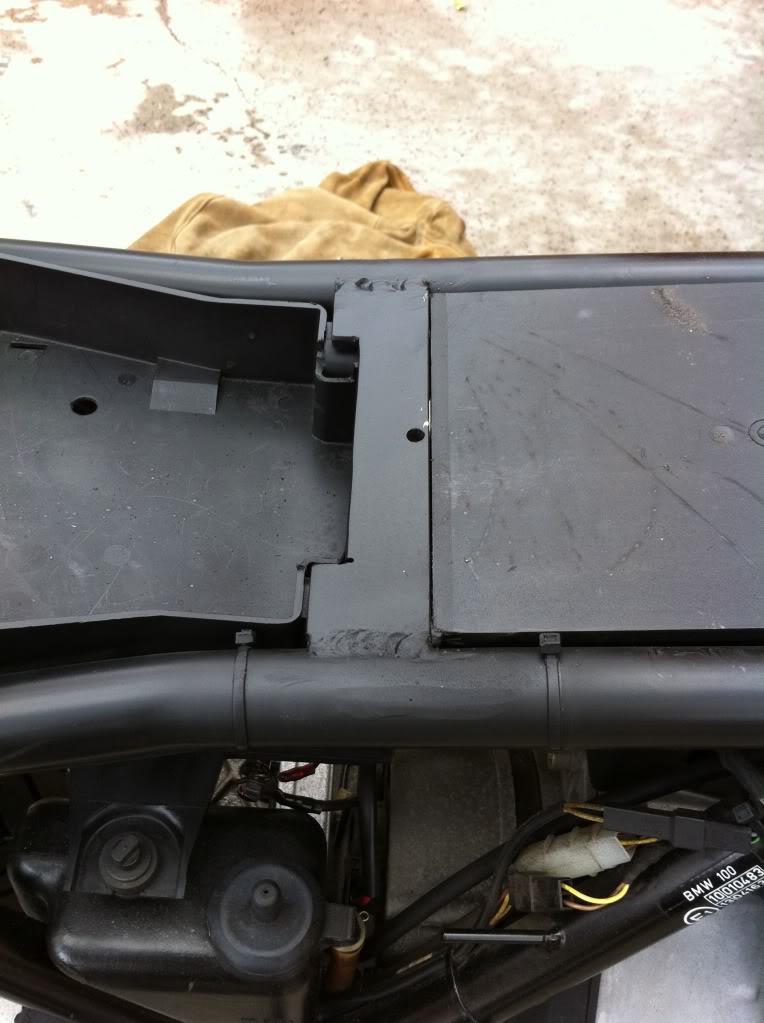
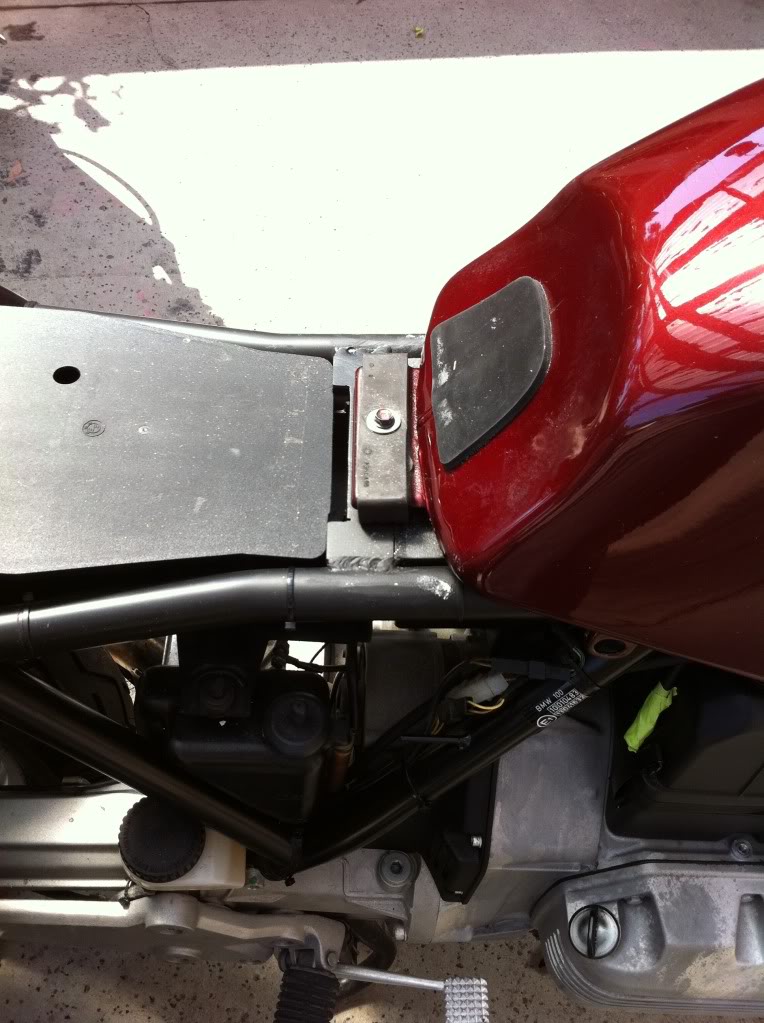
While trying to get the seat to fit, the tank mounting bracket was a constant annoyance because occupies a significant bit of height and width on the frame. After debating a bit, we decided to weld a new bracket in between the two plastic boxes under the tank and seat. This would function the same as the previous bracket, but be more flush with the frame in a cleaner way than the original. First I had to shave off the holders for the nuts:

My K100 Cafe racer project story 366b793f

My K100 Cafe racer project story B1195914

My K100 Cafe racer project story D59a114d


My K100 Cafe racer project story Fceff7b4

With the tank:
My K100 Cafe racer project story F7e219ef

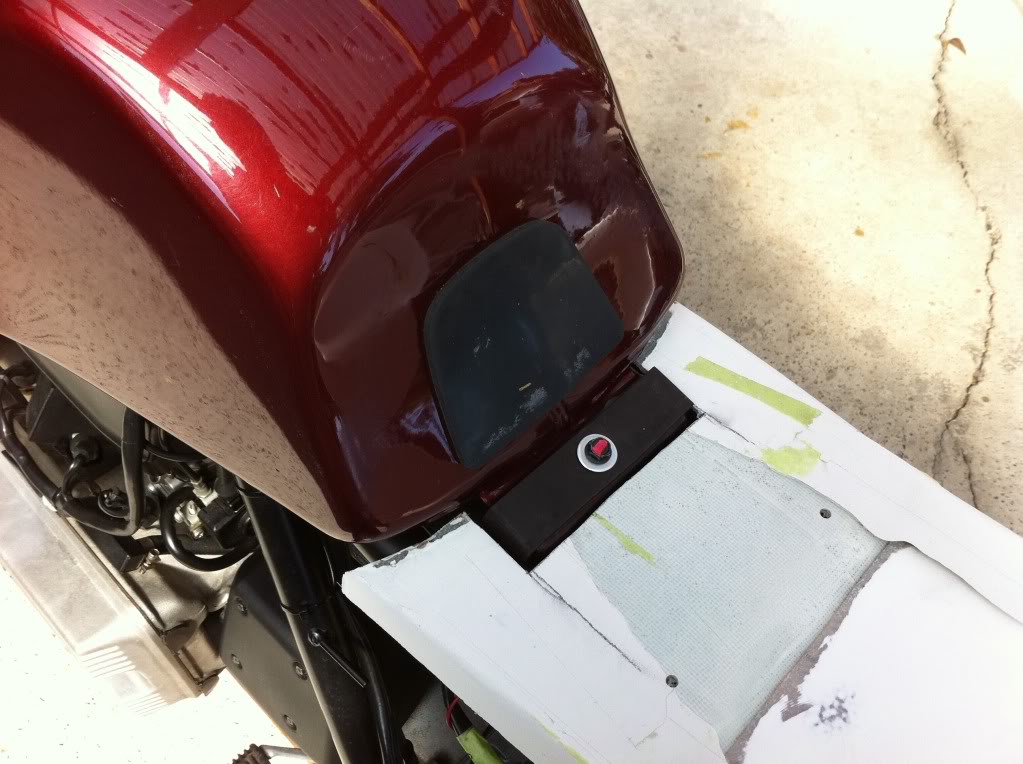
Now that the ugly bracket is gone, the new one just tucks away and let's the seat come flush with tank. Had to cut some fiber glass out of the seat, but the seat pan that sits on top will cover the cutaway.

My K100 Cafe racer project story 05a7e84a

With seat pan:
My K100 Cafe racer project story E2714211

Once this was done, I realized the seat didn't sit well on the frame... argh!! It was floating on top of the rear bracket because the bracket was 1/4" too wide on the sides. After cutting that off the edges, it finally sits well:

My K100 Cafe racer project story Eee1e21e

As you can see, it looks much like it did before... maybe worse, yet a lot has changed for the better. Massive improvement with the tail, custom brackets and now the seat is finally in correct position and sitting as desired.

What's left for the seat? Final fiber glass touch-ups, paint and seat pan upholstery. Anyone know of any good upholstery places in SoCal? I hear there are some decent, affordable shops south of the border...

If all goes according to plan this week, I should be able to go for a maiden ride this next weekend - can't wait!!

Rafael


44Back to top Go down   My K100 Cafe racer project story Empty Re: My K100 Cafe racer project story Sun Sep 25, 2011 6:02 am

charlie99

charlie99
VIP
VIP
"proper job" raf


well done mate


__________________________________________________
cheezy grin whilst riding, kinda bloke ....oh the joy !!!! ...... ( brick aviator )

'86 K100 RT..#0090401 ..."Gerty" ( Gertrude Von Clickandshift ) --------O%O
'86 k100 rs.. #######..  "Fred " (f(rame) red ) ( Fredrick leichtundschnell ) - -
bits and pieces from many kind friends across the k100 world ...with many thanks ..
1987 k100rs ########   "Red"  - (red sports rs TWB style )
1989 K100rt #009637   "Black Betty"  (naked rt ala Nigel , now sporting an rs main fairing )
    

45Back to top Go down   My K100 Cafe racer project story Empty Re: My K100 Cafe racer project story Sun Sep 25, 2011 1:33 pm

BIG D

BIG D
Life time member
Life time member
Cool


Thats some nifty handy work there raf, I like that switch mounting My K100 Cafe racer project story 112350

she is going to be a dream are you keeping the colour, oh nice dog by the way.


BIG D


46Back to top Go down   My K100 Cafe racer project story Empty Re: My K100 Cafe racer project story Tue Sep 27, 2011 4:56 pm

rbarrero

avatar
active member
active member
Thanks!

Lots of different opinions on the color... but I am planning on keeping the it - it's classy, unique and a pretty color (less work too).

By the way, anyone need a low mileage instrument cluster? I've posted my original one here: http://k100rt.aforumfree.com/t2691-1985-k100rt-instrument-cluster-with-4567-miles

More progress coming this weekend.

Cheers!


47Back to top Go down   My K100 Cafe racer project story Empty Seat is complete Sun Oct 02, 2011 3:14 am

rbarrero

avatar
active member
active member
Went to Mexico today with the seat pan and got it upholstered in Tijuana with some nice leather for $100 flat. Good workmanship and done it to my specs, so I'm pleased with the outcome. The seat/tail was painted the original color and will be ready tomorrow for installation. I will post pictures tomorrow!

On the electrical front, I built the small circuit described by Inge K. and used the suggested solid state relays that kept the footprint real small and should be easy to tuck away. I also connected the acewell unit and saw it come to life today when doing some testing of the connections. I haven't driven the bike yet, so I don't know if the internal speed sensor will suffice, or if I will have to attach the magnetic sensor. Will do a test drive tomorrow and determine that then!

The only problem I'm having, is the blinkers/turn signals... While testing the new turn signals, I wasn't able to get them to turn on when pushing the left or right buttons on the handlebar controls. In the rear harness, I only get power for the brake lighting. Anyone know if there is anything special required for the turn signals that I might be missing since removing the instrument cluster and front fairings?

Thanks!

Rafael


48Back to top Go down   My K100 Cafe racer project story Empty Re: My K100 Cafe racer project story Sun Oct 02, 2011 3:53 am

charlie99

charlie99
VIP
VIP
probly just a good earth on the brown wire going to each of the controls at the handlebars raf ...you still have the relay for the turn signals attached havent you ?


__________________________________________________
cheezy grin whilst riding, kinda bloke ....oh the joy !!!! ...... ( brick aviator )

'86 K100 RT..#0090401 ..."Gerty" ( Gertrude Von Clickandshift ) --------O%O
'86 k100 rs.. #######..  "Fred " (f(rame) red ) ( Fredrick leichtundschnell ) - -
bits and pieces from many kind friends across the k100 world ...with many thanks ..
1987 k100rs ########   "Red"  - (red sports rs TWB style )
1989 K100rt #009637   "Black Betty"  (naked rt ala Nigel , now sporting an rs main fairing )
    

49Back to top Go down   My K100 Cafe racer project story Empty Re: My K100 Cafe racer project story Sun Oct 02, 2011 4:05 am

robinm

robinm
Silver member
Silver member
The indicator circuit includes the dash and speedo, all part of the self cancelling feature, turning the indicators off after a certain distance traveled. Look carefully at the wiring diagram, there may be a way around it.Although I would be looking at building a separate indicator loom using a std flasher unit. The hardest part of this would be designing it in such a way to use the original 3 switch indicator switch set up that the K has. Good luck.


50Back to top Go down   My K100 Cafe racer project story Empty Re: My K100 Cafe racer project story Sun Oct 02, 2011 4:40 am

Guest

avatar
Guest
I remember back in '80 travelling to Tijuana from the San Fernando Valley (Granada Hills/Chatswood area) with Jose, a Mexicano I worked with at the print shop that employed us both, to get his sofa cushions covered in clear plastic so they'd look cleaner for longer. He had a lot of hijos y hijas (sons & daughters). I thought that was pretty silly but understood the cultural significance of it and simply enjoyed our day together in that infamous city. The food and drink was fantastico, the sights and sounds and scents at times overwhelming. I saw artisans, craftsmen and women at work hammering and sewing and stitching, cooking and laughing and living. I wish I still had that sort of place to go to get something covered or repaired or just to take it all in. Life is transient and fleeting yet full of magic and if you really take it in it is beautiful.

I hope you post a picture of that piece of artwork that is merely a seat but that you will plant your posterior on in the corners as you lever the brakes hard entering a tight corner and then crack open the throttle as you set yourself up for the next...as the roads and the corners and life come at you. Never forget the reason we are here.


Sponsored content


View previous topic View next topic Back to top  Message [Page 1 of 3]

Go to page : 1, 2, 3  Next

Permissions in this forum:
You cannot reply to topics in this forum