1

 Karamba speedometer calibration program tutorial Sun Apr 03, 2011 10:21 am
robmack
Life time member

KARAMBA - K-Bike Speedometer Calibration Tool
Karamba is written by Michael Köcher (six1) and Peter Stefan (Pezi) of www.flyingbrick.de fame. The purpose of Karamba is to calibrate a K-bike speedometer and verify that both the speedometer and odometer are functioning and functioning properly.
Installation
The software can be downloaded from the Köcher Elektronik web site. (This site is now password protected and we don't have access to it)
The software can be downloaded from here.(This is the K100-forum member shared documents). Password to enter this site is disclosed at the top of our regular download page in the yellow box:

The PC requirements are:

The PC interfaces to the motorcycle through the connector joining the speed transducer in the final drive to the main wiring harness (picture above). A laptop is best for this application because it is portable and self-contained. Most laptops have integrated displays and sound cards.
It is necessary to manufacture a very simple cable to connect the plug on the motorcycle to the PC through the 3.5mm audio output of the sound card.
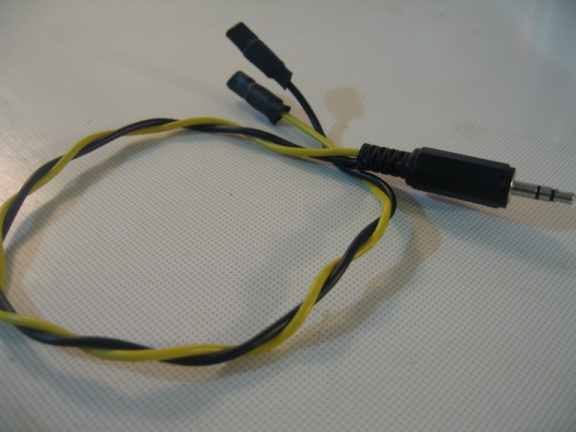
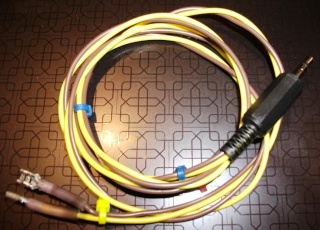
The cable consists of a 3.5mm stereo plug at one end and two 1/8” spade connectors at the other (picture above). The wire should be 18GA stranded and the length does not really matter but should be long enough to accommodate placing the PC near the motorcycle. Don't use a 3.5mm mono plug as it will short circuit the soundcard output in the PC.

Solder the black wire (GROUND) to the shield connection in the plug. The shield connection is usually the long strain relief. The yellow wire (SIGNAL) can be soldered to either one of the remaining tip or ring connections, it doesn’t matter. Ensure that the connections are solid and not shorted together. Carefully clip away stray strands of loose wire to prevent this from happening when you assemble the plug. Crimp 1/8” spade connectors to each of the unconnected ends of the wires. It is very important to cover the spade connectors fully in shrink tubing to prevent shorting of the connectors when they are inserted into the transducer connector on the motorcycle.
Insert the 3.5mm plug into the headphone output of the soundcard on the PC. Locate the transducer connector on the motorcycle; usually this is on the right hand frame member, halfway down the diagonal brace and near the fuel tank plug and coolant overflow tank. The connector is square in shape and has two wires – Brown and Yellow.
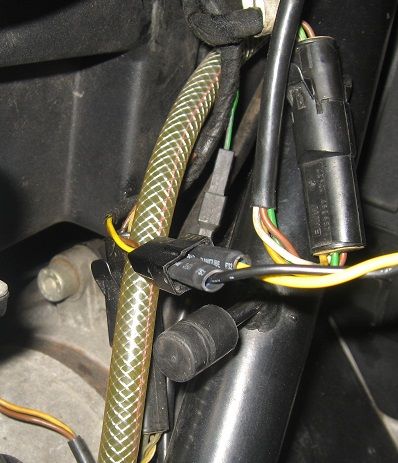
Separate the connector parts and insert the spade ends of the cable into the male connector leading up to the main wiring harness. Connect the Yellow wire to the Yellow pin, the Black wire to the Brown pin as shown in the picture above.
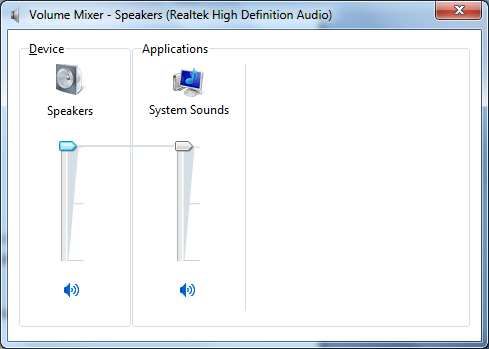
Open the Windows Sound Control Panel on the PC and make sure that the volume control is at maximum and that the sound output is not muted.
Use
Start the karamba.exe program on the PC. The main page of Karamba looks like this:
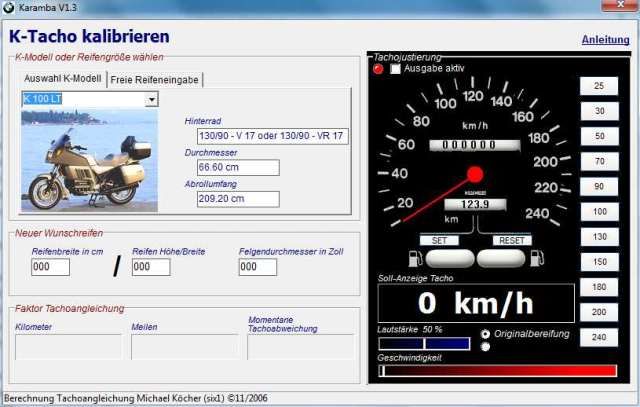
To assist those whose understanding of German is lacking, I’ve translated (to the best of my ability) the dialog box labelling:
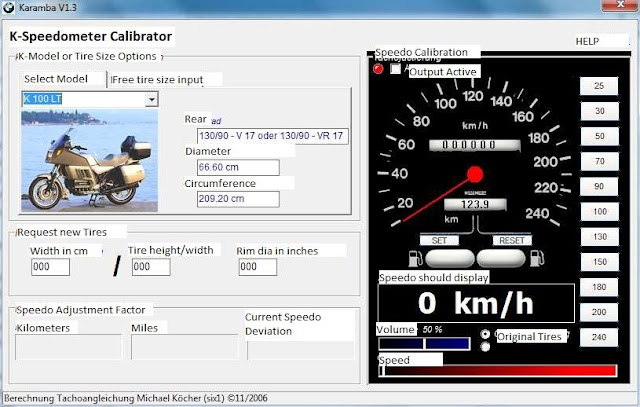

The main page is broken into two sections. The left half has dialog boxes and pull down menus for selecting rim and tire sizing for your motorcycle. The right half has a simulated speedometer with speed control buttons down the far right.
Tire Selection
The first step in using the Karamba program is to select the proper tire and rim sizing for your bike.
The program attempts to simplify usage for the average rider by providing a pull down menu on the Select Model tab. The menu contains a list of popular K-bikes (from K75 through K100 and K1100 and even K1 for those lucky few graced with owning one of these bikes). Select your bike from the pull down menu. The missing information in the other dialog boxes will be automatically populated with BMW standard rim and tire sizing one a model is selected.
Alternatively, if your bike has been modified and is using non-standard tire sizes as recommended by BMW, then the other tab, Free Tire Size Input, will allow you to specify the tire width, tire height and rim diameter for those tires you have fitted. Only the back tire needs to be specified.
Speed Selection and testing
Once the PC is connected to the speedometer through the transducer connector and the proper tire dimensions selected in the program, then turn on the bike’s ignition to apply power to the bike. Make sure that the radio button, Output Active, is checked in Karamba. Using the PC mouse, select various road speeds in kilometres per hour from the set of buttons on the far right. That selection will cause the simulated speedometer to register that exact speed and the bike’s speedometer to operate and display those speeds as well. In addition, the odometer will start to register distance.
Troubleshooting
Karamba can be used as a general tool for
Another test that can be performed on the instrument cluster using Karamba is testing the odometer for proper operation. Selecting a very high speed from the speed selector buttons (200 Km/Hr for example) will cause the odometer to register distance travelled quite quickly. This mode of operation allows you to see that the odometer mechanics are working and that the trip and odometer are synchronized. Compare the Karamba odometer values to the actual instrument cluster values will highlight any synchronicity problems. Failure here could indicate broken odometer gears or a defective odometer solenoid within the instrument cluster.
Bench Testing
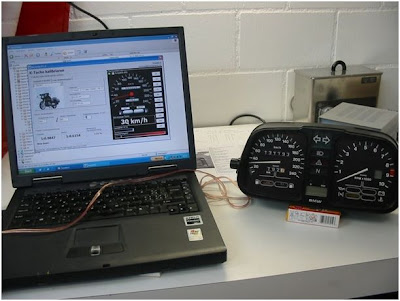
It is also possible to remove the instrument cluster from the motorcycle and bench test the unit using Karamba. All that must be supplied to the instrument cluster is 12 volt power and proper signals to the transducer inputs on the cluster.
Karamba is written by Michael Köcher (six1) and Peter Stefan (Pezi) of www.flyingbrick.de fame. The purpose of Karamba is to calibrate a K-bike speedometer and verify that both the speedometer and odometer are functioning and functioning properly.
Installation
The software can be downloaded from the Köcher Elektronik web site. (This site is now password protected and we don't have access to it)
The software can be downloaded from here.(This is the K100-forum member shared documents). Password to enter this site is disclosed at the top of our regular download page in the yellow box:

The PC requirements are:
- Windows 2003 / XP/ 7 / Vista
- Sound card, such as Creative Soundblaster
- 512MB memory
- 4MB disk for installation

The PC interfaces to the motorcycle through the connector joining the speed transducer in the final drive to the main wiring harness (picture above). A laptop is best for this application because it is portable and self-contained. Most laptops have integrated displays and sound cards.
It is necessary to manufacture a very simple cable to connect the plug on the motorcycle to the PC through the 3.5mm audio output of the sound card.

The cable consists of a 3.5mm stereo plug at one end and two 1/8” spade connectors at the other (picture above). The wire should be 18GA stranded and the length does not really matter but should be long enough to accommodate placing the PC near the motorcycle. Don't use a 3.5mm mono plug as it will short circuit the soundcard output in the PC.

Solder the black wire (GROUND) to the shield connection in the plug. The shield connection is usually the long strain relief. The yellow wire (SIGNAL) can be soldered to either one of the remaining tip or ring connections, it doesn’t matter. Ensure that the connections are solid and not shorted together. Carefully clip away stray strands of loose wire to prevent this from happening when you assemble the plug. Crimp 1/8” spade connectors to each of the unconnected ends of the wires. It is very important to cover the spade connectors fully in shrink tubing to prevent shorting of the connectors when they are inserted into the transducer connector on the motorcycle.
Insert the 3.5mm plug into the headphone output of the soundcard on the PC. Locate the transducer connector on the motorcycle; usually this is on the right hand frame member, halfway down the diagonal brace and near the fuel tank plug and coolant overflow tank. The connector is square in shape and has two wires – Brown and Yellow.

Separate the connector parts and insert the spade ends of the cable into the male connector leading up to the main wiring harness. Connect the Yellow wire to the Yellow pin, the Black wire to the Brown pin as shown in the picture above.

Open the Windows Sound Control Panel on the PC and make sure that the volume control is at maximum and that the sound output is not muted.
Use
Start the karamba.exe program on the PC. The main page of Karamba looks like this:

To assist those whose understanding of German is lacking, I’ve translated (to the best of my ability) the dialog box labelling:


The main page is broken into two sections. The left half has dialog boxes and pull down menus for selecting rim and tire sizing for your motorcycle. The right half has a simulated speedometer with speed control buttons down the far right.
Tire Selection
The first step in using the Karamba program is to select the proper tire and rim sizing for your bike.
The program attempts to simplify usage for the average rider by providing a pull down menu on the Select Model tab. The menu contains a list of popular K-bikes (from K75 through K100 and K1100 and even K1 for those lucky few graced with owning one of these bikes). Select your bike from the pull down menu. The missing information in the other dialog boxes will be automatically populated with BMW standard rim and tire sizing one a model is selected.
Alternatively, if your bike has been modified and is using non-standard tire sizes as recommended by BMW, then the other tab, Free Tire Size Input, will allow you to specify the tire width, tire height and rim diameter for those tires you have fitted. Only the back tire needs to be specified.
Speed Selection and testing
Once the PC is connected to the speedometer through the transducer connector and the proper tire dimensions selected in the program, then turn on the bike’s ignition to apply power to the bike. Make sure that the radio button, Output Active, is checked in Karamba. Using the PC mouse, select various road speeds in kilometres per hour from the set of buttons on the far right. That selection will cause the simulated speedometer to register that exact speed and the bike’s speedometer to operate and display those speeds as well. In addition, the odometer will start to register distance.
Troubleshooting
Karamba can be used as a general tool for
- Validating that your speedometer cable connections are solid and that the wiring from the transducer connector to the instrument cluster is intact
- Validating that the speedometer internals are functioning
- Isolating problems where you suspect the speedometer transducer is malfunctioning
- Ensuring that the odometer mechanics are intact
- Validating and calibrating the accuracy of the speedometer display
Another test that can be performed on the instrument cluster using Karamba is testing the odometer for proper operation. Selecting a very high speed from the speed selector buttons (200 Km/Hr for example) will cause the odometer to register distance travelled quite quickly. This mode of operation allows you to see that the odometer mechanics are working and that the trip and odometer are synchronized. Compare the Karamba odometer values to the actual instrument cluster values will highlight any synchronicity problems. Failure here could indicate broken odometer gears or a defective odometer solenoid within the instrument cluster.
Bench Testing

It is also possible to remove the instrument cluster from the motorcycle and bench test the unit using Karamba. All that must be supplied to the instrument cluster is 12 volt power and proper signals to the transducer inputs on the cluster.
Bench testing allows you to:Rig G wrote:
This is the pin numbers if you want to do it on the bench. It makes it a heap easier to do and about 1/10 of the time
Pin # Wire Color Function 6 Green/black for 2V K bikes 12V+ power 6 Green for 4V K bikes 12V+ power 22 Yellow Speedometer sensor 23 Brown Ground
- Validate that contact cleaning process performed on the contacts within the instrument cluster is successful
- Validating that circuit repair work or FRU replacement is correct
- Adjust the speedometer calibration pot to re-calibrate the speedometer for any tire or rim modifications that might have been made on the bike’s rear wheel
Geoff Adams (IBMWR) wrote:
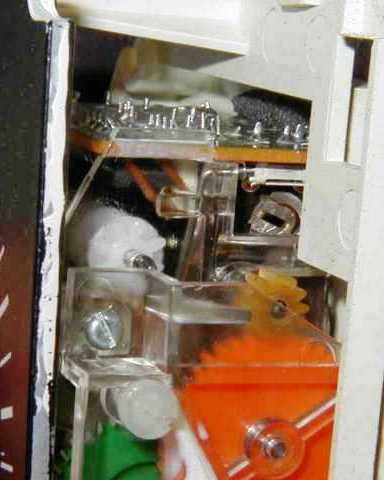
The speedometer on my '85 K100RS read about 10% fast at any given speed. It can be adjusted by turning a potentiometer within the speedometer itself.
The pot is the small metal part in the photo just above the yellow plastic gear. Use a miniature screwdriver in the rectangular slot.
An approximate 90 degree turn to the right (clockwise) doubled the error to about 20% high. A turn to the left of about 40-45 degrees (as far as it would go in this case) seems to have exactly corrected the speedometer reading. ( A normal K100RS [2.81 final gear] characteristic is that when in 5th gear, both the speedo and tach needles remain exactly parallel to each other at all speeds.)
Here's the dashpot adjustment:
It's the aluminium variable resistor with the small, flat slot right above the small, yellow cog.
Two Wheels Better wrote:Success! I'm a believer now. Get behind me Satan!
The initial reading of the speedo was about <8 kilometres per hour faster than I was actually travelling at motorway speeds. I've managed to adjust it to be accurate to within two or three kilometres plus @ 200 kmh! Interestingly, it is far more accurate from 70kmh through about 130kmh then it starts to gain speed. Down low it reads high, then, as I said, it levels out, then begins to read slightly high again. This could be a quirk of my speedometre. I've always wondered how accurate it was in school zones which here are set at 40 kmh. It's reading 42 kmh now. I'll have to be careful to not get nicked by the safety coppers. Good though, that at 110 kmh indicated, our motorway's absolute limit, I would actually be travelling at 110 kmh.
To paraphrase what Charlie99 & K Freak said a few weeks back when we went for a ride, that's accurate information that you can use in your own way. I am not the sort of person who sets his bedroom clock five minutes ahead to fool myself into getting up in time.
Another thing...selecting slightly different tyre sizes doesn't change the accuracy very much at all. For example, if 100 kmh is desired, specifying a 130/90-17 tyre shows 99.5 kmh, a 140/80-17 shows 100 kmh spot-on, and a 160/60-18 displays barely 101 kmh. So, those of us who've replaced a stock 130/90-17 with a plus-one 140/80-17, or even gone up to the 4.5"X18" wheel with a 160/60ZR18 can breathe easy that we're not way out on our indicated speed.
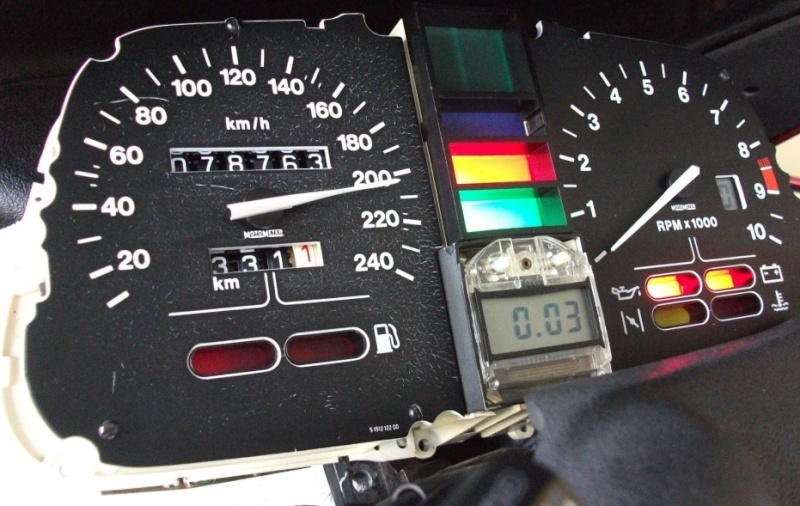
With Karamba displaying 110 kph on the laptop this is what I was able to adjust my speedo to with the exposed guts plugged into the bike, shielded from debris and resting against the inner fairing. Perty good for non-government work, I'd say.
The odometre appeared to be accurate to less than a click or <1/10th of a tenth of 1 km over the course of 5 kms travelled that I observed it at 100 kmh on the snout. I'll take that minor error. Tyre wear would change it that little.
It took no time to knock out this 1 metre-length plug and connectors. Any locals wanting to borrow it are welcome.
The Karamba monkey say 200 kmh...what's this, maybe 202 kmh...close enough for this fool. Now I know when a coupla years ago I got flat out on my unladen 'bike on a remote, piney woods stretch of Summerland Way in northern NSW, with my helmet down behind the fairing, and my brains in my boots, and saw an indicated 245 kph @ 9000 rpm. I was actually travelling at a more realistic 225 kph when calculating using the previous 8% margin of error.
__________________________________________________
Robert
1987 K75 @k75retro.blogspot.ca


