1

 A Method of Posting Images Wed 05 Jun 2019, 03:35
Laitch
Life time member

Posting photos here has been one of the easiest methods I've done on the Web. It's a damn sight easier than transmission input spline lubrication or rebuilding a brake caliper—once it's understood—and it's cleaner too.
Everything begins with clicking the Message/Reply box. Click on the icon indicated by the red arrow here. The first time you do that to post an image here, you might get a message from the image host server. Just comply with it and move on. You won't need to do that again. After that, you should see the photo posting work box.

The image below shows the photo posting work box. From here on out, any time you click the Message box, the work box will disappear. To retrieve it, simply click the work box icon in the menu that you clicked to start this process. Now, click the Select files box.

When the Select files box is clicked, usually an image of your desktop appears. Navigate to the photo you want, highlight it (the example used here is at thetop red arrow–dragonparty179), then click the Open button at the bottom right.

The photo you opened in the previous step now appears as a thumbnail in the photo work box. Click the button with the image of a vertical arrow over a line, indicated by the red arrow, and a bar will move across the bottom of the image. The bar indicates the image is being uploaded. When it stops, the image is ready to post into your message.

Now click the icon indicated by the arrow here to import the image wherever your cursor was located in the message box.

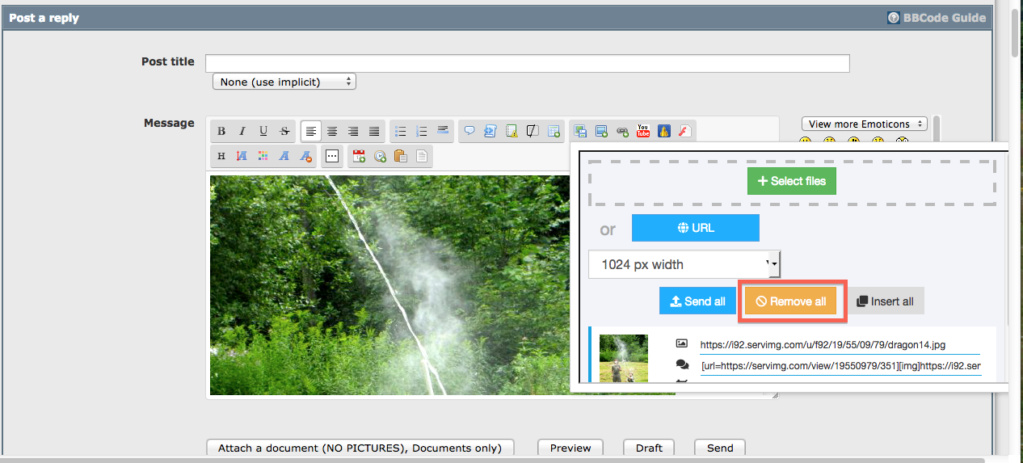
The image has been imported into the Message box. Now, import another image by repeating the previous steps, write a caption for the photo, or just add more text.

The is the complete photo taken one hot summer's day.

Everything begins with clicking the Message/Reply box. Click on the icon indicated by the red arrow here. The first time you do that to post an image here, you might get a message from the image host server. Just comply with it and move on. You won't need to do that again. After that, you should see the photo posting work box.

The image below shows the photo posting work box. From here on out, any time you click the Message box, the work box will disappear. To retrieve it, simply click the work box icon in the menu that you clicked to start this process. Now, click the Select files box.

When the Select files box is clicked, usually an image of your desktop appears. Navigate to the photo you want, highlight it (the example used here is at thetop red arrow–dragonparty179), then click the Open button at the bottom right.

The photo you opened in the previous step now appears as a thumbnail in the photo work box. Click the button with the image of a vertical arrow over a line, indicated by the red arrow, and a bar will move across the bottom of the image. The bar indicates the image is being uploaded. When it stops, the image is ready to post into your message.

Now click the icon indicated by the arrow here to import the image wherever your cursor was located in the message box.

The image has been imported into the Message box. Now, import another image by repeating the previous steps, write a caption for the photo, or just add more text.

The is the complete photo taken one hot summer's day.

Last edited by Laitch on Sun 31 Dec 2023, 04:28; edited 5 times in total (Reason for editing : Update text)
__________________________________________________
1995 K75 90,000 miles


 1986 k75, 1985 K100rt,