BMW K bikes (Bricks)


You are not connected. Please login or register

View previous topic View next topic Go down  Message [Page 1 of 1]


Fentible

Fentible
Silver member
Silver member
Busy rebuilding a spare pump to keep on the shelf. Its a cast Iron impeller and the seal was purchased quite cheaply.
Firstly the spare pump has an additional sender unit screwed into a point that is blanked off with a bolt on my original pump. No biggie just curious as to its purpose.
Now then the seal I have been supplied with as the correct part for a cast impeller pump, has a plastic cage which i will assume is purely for transportation and storage purposes.
The problem is the uppermost seal diameter seems to large for the impeller shaft. The seal through which the shaft enters is a tight fit (or will be), however the seal through which the impeller shaft exits is a larger diameter than the shaft.
I am attaching explanatory photos, but basically, have I been supplied with the wrong seal?? I though at first that the impeller itself may have a boss that fits into the seal but it doesn't. Additionally the impeller shaft appears to have two points of rubbing contact.

Impeller shaft with seal as supplied.
water/oil pump. Is this the right seal?? 011-1

Here you can see that the uppermost seal is a larger diameter than the impeller shaft
water/oil pump. Is this the right seal?? 010-2

As ever, advice from those who know wold be greatly appreciated.

Fent


Rick G

Rick G
admin
admin
The seal is the correct one. The sealing takes part on the 2 parts of the seal not onto the shaft. One part fits into the housing and the other clamps onto the shaft and the two parts move against each other and make a seal.
There is a later type of seal which in my opinion is far better but can't be used with that shaft. You need the later type of shaft and they are expensive. Check the part of the shaft that the oil seal runs on and if you can feel a depression with your fingernail it needs to be replaced. One other thing to be awate of is that the threaded section on those early type shafts have a habit of snapping and leaving you with an overheating engine.
If the seal area is damaged then you will need to get a new shaft as those have been superceeded by one that has a threaded hole for a bolt.
Personally I would be replacing the shaft and getting the later seal kit but that is your decision and if the oil pump seal area on the shaft is OK then it really isnt necessary and would perform well as it is.


__________________________________________________
"Man sacrifices his health in order to make money.
Then he sacrifices money to recuperate his health.
And then he is so anxious about the future that he does not enjoy the present; the result being that he does not live in the present or the future; he lives as if he is never going to die, and then dies having never really lived."   Dalai Lama


Bikes 1999 K1100 LT with a Big Block 1200
    

MikeP

MikeP
Life time member
Life time member
The additional sender is for the optional temperature gauge.


Fentible

Fentible
Silver member
Silver member
You guys are the best!
Rick, thanks for the seal info and yes I fully appreciate that getting the modified pump parts would be the best bet but despite some marking, the seal area on the impeller shaft is unworn. Its only to keep as an emergency spare.
Mike thanks for identifying the spare sender port.

Fent


5Back to top Go down   water/oil pump. Is this the right seal?? Empty As said above... Fri Apr 26, 2013 12:09 pm

ibjman

ibjman
Life time member
Life time member
As said above........you'll probably end up throwing this seal & shaft away when you get it all assembled and tighten the final nit on the front of the impeller when the thread "snaps off" in your hand just as you get the idea you've got it done.
Take the advice of others that have gone before you and discard the shaft now. The metal in the end of the shaft thread is all crystalized and will indeed "dissolve" in your hand.


Avenger GT

Avenger GT
Life time member
Life time member
Dump the shaft, it will break, and you can't remove it without damaging the new water pump seal.


Fentible

Fentible
Silver member
Silver member
Ah.......................harbingers of doom Very Happy
You are probably right but still worth a go in my book. I promise to let you know either way.
Now can someone just tell me which way this pesky seal goes in please and what torque the end nut should be tightened to? (preferably a pre-snapping amount)


Avenger GT

Avenger GT
Life time member
Life time member
The one on mine didn't even get to a torque figure, barely hand tight with a small ring spanner and it snapped off. You have been warned!!! Rolling Eyes


Fentible

Fentible
Silver member
Silver member
Warning duly noted Avenger...............but which way does the seal go in??


walfish

walfish
Life time member
Life time member
The "U" side faces into the engine, solid flat side(with the writing) out into the pump or water side.


__________________________________________________
water/oil pump. Is this the right seal?? Uk-log10
                            88 K75 S 0107569 (she's a keeper)
                            88 K 100  0033026 (gone)
   
                            92 K 1100 LT  6455097 (gone)
    

Fentible

Fentible
Silver member
Silver member
Hi Ungaas, thanks for that however its the seal in its entirety Im unsure of. If you look at my initial photos you will see the combination of seals contained in a plastic cage which I assume is simply discarded? However once the plastic cage is removed, is this the order that the various parts are inserted into the pump? ie small end in first, ending with the large black seal face up and against which the impeller seats??
The parts diagrams Ive looked at are unclear as is the haynes manual I have which shows the later cast impeller shaft. I have read so much about the varying shafts and their counterpart seals that I'm unsure as to how this particular item should be fitted. Anyone have photos or a clear description of how these are fitted into the pump?


twincarb

twincarb
Life time member
Life time member
have you read through this


__________________________________________________
BMW K100LT 1988 Matt Black Peugeot Electra Blue (ELX) Colour is now confirmed...
Yamaha Thundercat
Triumph Spitfire (not a bike but hell it's British chaps)
water/oil pump. Is this the right seal?? 169042water/oil pump. Is this the right seal?? 169034
    

13Back to top Go down   water/oil pump. Is this the right seal?? Empty you only pictured 1 seal Tue May 07, 2013 5:59 pm

ibjman

ibjman
Life time member
Life time member
You only pictured 1 seal, it is the water pump seal. The side with the plastic goes into the housing last or up, but only after the neoprene oil pump seal goes in to the bottom of the cavity 1st. The Oil pump seal, like all standard seals goes into the housing with the lip facing in towards the oil. By the lip side I mean the side that has a round "gator" spring wrapped around the seal surface. Peek inside under the lip you'll see it but don't disturb the spring. It keeps the lip edge of the seal wrapped tightly around the oil pump shaft until oil pressure occurs to apply pressure there.
After the oil seal is correctly seated in the bottom of the shaft bore, the water pump seal is installed next with the plastic covered proctored side up. or in last. this has to be installed very carefully to avoid: SEE INGE's NOTE about the plastic will break away upon installation (normal) SORRY INGE & THANK YOU
#1 damaging the seal
#2 disassembling the parts of the seal from around the coil spring. The coil spring is designed to hold the rotating sliding surface of the seal firmly against it's seat (slip ring) (usually a ceramic piece) & very fragile.
When you have both seals in place, you end up with a void area between them that is connected to a little drain hole in the front bottom of the oil pan. If the water or oil side seals leak, the leakage, runs down & out the drain hole without contaminating the opposite side fluid.
Once the seals are in place, the shaft is reinserted from the back side and drawn up through the center diameter of the water pump seal so the inside of that seal seals tightly around the shaft and then rotates with the shaft.
I am not familiar with the old style seal, but I believe it's rubber on the inside and will reasonably easily allow the shaft to slide through it. You may have to keep gentle pressure on the outer surface of the seal as you put the shaft through it to prevent the drag between the seal & shaft from pulling the seal apart off the coil spring. I'm just not sure.

The newer style seal is a "press fit" to the shaft and has to be drawn through the center of the seal using the bolt & 2 different spacers + the impeller to apply inward force on the seal as the shaft comes through in the outward direction.
Good luck


Last edited by ibjman on Tue May 07, 2013 9:06 pm; edited 1 time in total


Inge K.

Inge K.
VIP
VIP
Hi Fent.

About the version of water seal you got, have a look at this and this.


__________________________________________________
Inge K.
K100RS -86. (first owner), K1100LTSE -94.
    

Ned

Ned
Life time member
Life time member


__________________________________________________
I reserve the right to voice my opinions on any subject known to man
Ned

05/1986 (K55) K100RS Motorsport (Europe), Production Code: 0503, 110k km, VIN:0140519 (SOLD)
1976 Honda Goldwing GL1000 (naked)
1997 BMW K1200RS red, VIN: WB10544A1VZA22667
    

Fentible

Fentible
Silver member
Silver member
Thank you for leaping in all. Ned, Inge K, and twincarb for the helpful links and IBJman for the detailed explanation.
I hadn't appreciated that I was missing the oil seal, looking at it now its fairly obvious. I assumed the plastic caged item was all I needed. The cage itself also makes much more sense having read the IngeK's link to a BMW sevice notice.
In deference to all who have advised binning the impeller shaft for the later items, the sole reason Im persevering is that so far the cost of parts has been less than £5 (plus an oil seal which I will order today) And once (if) finished its simply going on the shelf as a 'get me back on the road quickly' spare. It just didn't make sense, at this stage, to incurr the cost of the modified parts. Not a case of ignoring those on this board who have the experience and knowledge.
Thank you all again
Fent


17Back to top Go down   water/oil pump. Is this the right seal?? Empty We all hope Wed May 08, 2013 12:59 pm

ibjman

ibjman
Life time member
Life time member
We all hope you do well. And I am hoping that you are the exception case to the "general rule" the rest of us have learned.
It's hard to express the level of disappointment that most of us felt after the stressful moments of trying to get the water pump set just right to have the shaft stud almost just "fall off" the end of the impeller with the nut still attached before the nut ever begins to feel properly tightened.
That said, it's easier to understand now your reasons for moving forward as planned. You have nothing to lose.
If you end up having to re-do, you probably could salvage the new oil seal in the housing by carefully not disturbing it when you remove the newly installed water pump seal. You will want to replace that along with the customary new shaft and additional spacers + impeller.
I think you made a good choice, being as how the pump is a spare only.. Good luck, take pictures for us along the way & keep us all posted on your progress.
Although the newer seal design is supposedly "better" the old design took a lot of K bikes a lot of trouble free miles before the newer one was developed.
Regards, ibj....


18Back to top Go down   water/oil pump. Is this the right seal?? Empty By the way???? Wed May 08, 2013 1:02 pm

ibjman

ibjman
Life time member
Life time member
By the way, all you coolant pump aficionados.........I have the pump off my 86K 75. Inspection reveals that it has a bolt in the end of the shaft, but still has a cast Impeller.
Can I assume it will still need an updated shaft & spacers + impeller when I rebuild it?


Ned

Ned
Life time member
Life time member
ibjman wrote:By the way, all you coolant pump aficionados.........I have the pump off my 86K 75. Inspection reveals that it has a bolt in the end of the shaft, but still has a cast Impeller.
Can I assume it will still need an updated shaft & spacers + impeller when I rebuild it?

My experience is that the amount of corrosion on the shaft tends to dictate things. If it is cactus new seals will not work ... you will have to get all the bits. From memory the shaft comes with the oil pump gear.


__________________________________________________
I reserve the right to voice my opinions on any subject known to man
Ned

05/1986 (K55) K100RS Motorsport (Europe), Production Code: 0503, 110k km, VIN:0140519 (SOLD)
1976 Honda Goldwing GL1000 (naked)
1997 BMW K1200RS red, VIN: WB10544A1VZA22667
    

Rick G

Rick G
admin
admin
ibjman wrote:By the way, all you coolant pump aficionados.........I have the pump off my 86K 75. Inspection reveals that it has a bolt in the end of the shaft, but still has a cast Impeller.
Can I assume it will still need an updated shaft & spacers + impeller when I rebuild it?
I buy just the seals and O rings then machine 3mm of the back of the boss of the impeller and all is good.


__________________________________________________
"Man sacrifices his health in order to make money.
Then he sacrifices money to recuperate his health.
And then he is so anxious about the future that he does not enjoy the present; the result being that he does not live in the present or the future; he lives as if he is never going to die, and then dies having never really lived."   Dalai Lama


Bikes 1999 K1100 LT with a Big Block 1200
    

ibjman

ibjman
Life time member
Life time member
I'm guessing this is still the old type seal without the spacers on the shaft regardless of the fact that it has a bolt rather than a nut. That is the question. What's inside this pump?
Not looking for information about what others have done to repair theirs. + few of the users here have the equipment to machine the impeller.
Thanks for your ideas.


Rick G

Rick G
admin
admin
Unless your shaft is damaged by rust pitting or seal lip damage then there is no need for a new shaft just seals, O rings,spacer and impeller.


__________________________________________________
"Man sacrifices his health in order to make money.
Then he sacrifices money to recuperate his health.
And then he is so anxious about the future that he does not enjoy the present; the result being that he does not live in the present or the future; he lives as if he is never going to die, and then dies having never really lived."   Dalai Lama


Bikes 1999 K1100 LT with a Big Block 1200
    

Fentible

Fentible
Silver member
Silver member
Well I know its been a while since I posted the original topic but I did say that I would come back and let the forum know how I got on with my early water/oil pump rebuild, the one with the dodgy nut.

I've been busy with a non BMW rebuild now finished and out the garage door so I can once again turn my attention to the K100.

I got around to finally rebuilding the spare pump, fiddliest bit was definitely retrieving the bits of plastic that broke off the water seal installation cage into the chamber................I got to seven pieces (there are 8 ). After scrabbling around the floor, bench and fishing around the interior of the pump with bits of wire, I eventually discovered the final piece resting between the laces of my right shoe.

The most nerve wracking bit was tightening the centre nut to the specified 21 newton metres, I only breathed out after the torque wrench signalled the achievement. Given a few people have experienced the threaded portion of the shaft shearing off at this point, I guess I've been lucky.


   water/oil pump. Is this the right seal?? BMW14-12-2013010


charlie99

charlie99
VIP
VIP
yay !...nice result .


__________________________________________________
cheezy grin whilst riding, kinda bloke ....oh the joy !!!! ...... ( brick aviator )

'86 K100 RT..#0090401 ..."Gerty" ( Gertrude Von Clickandshift ) --------O%O
'86 k100 rs.. #######..  "Fred " (f(rame) red ) ( Fredrick leichtundschnell ) - -
bits and pieces from many kind friends across the k100 world ...with many thanks ..
1987 k100rs ########   "Red"  - (red sports rs TWB style )
1989 K100rt #009637   "Black Betty"  (naked rt ala Nigel , now sporting an rs main fairing )
    

BIG D

BIG D
Life time member
Life time member
Cool 

Well done, this forum is the best tool in the toolbox.  Very Happy 

BIG D


richarde1605

richarde1605
active member
active member
As an aside about the groove worn in the shaft. On my now 'spare' K100RS I brazed the groove up and skimmed it on a lathe then polished and crosshatched it, still fine 40,000km later..


__________________________________________________
VIN 0087976
Other bikes in the shed: Another '86 K100RS, '98 XR400, '59 C71 Honda, '80 CanAm 400 MX6B, XL250, 2X DS80, XR100, XS650 and some........
    

Fentible

Fentible
Silver member
Silver member
Thanks all and I agree Big D I'd definitely have messed the new seals up without advice from the good people on this forum.
 
Richarde that's a fairly high tech approach, wish I had the skills and the tools.

Next bit is removing the TB's for a clean up...................another topic post imminent.

Fent


@kustom_moto

@kustom_moto
Silver member
Silver member
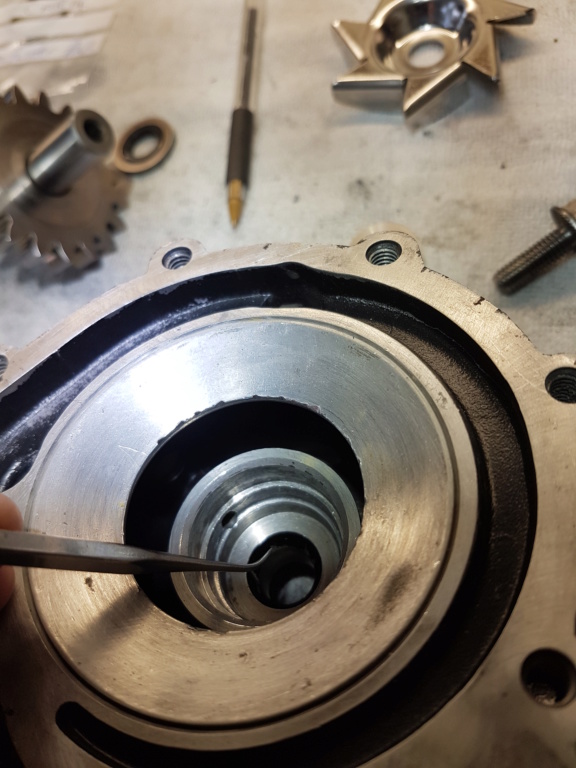
Guys, I have just gone to pull the shaft through but the oil seal has popped out of place and I have had to destroy the water seal and start again. I think I had the oil seal upside down.  Please can someone clarify which way up this seal is supposed to go, I had it flat side facing forward. It appears to me this is the reason it popped out of place because the shaft is designed to enter that seal only 1 way. The shaft seems to like to enter the seal from the flat side. 

Any help really appreciated 

Paul


__________________________________________________
1988 K100 LT
1984 K100 RS

Instagram K100 Build follow me at: @kustom_moto
    

nobbylon

nobbylon
Silver member
Silver member
The small black seal goes in open end with spring first. I used a socket on the closed end to drift it in until it seats fully. Use a little grease onthe edge to help.


__________________________________________________
R1100GS Feb 1995
K100RS July 1989
R90s June 1975
R75/6 Feb 1976
F650GD May 2001
    

@kustom_moto

@kustom_moto
Silver member
Silver member
Why then does the seal have a raised lip which surely should sit into the beveled recess in the pump body?water/oil pump. Is this the right seal?? 20180910water/oil pump. Is this the right seal?? 20180910
water/oil pump. Is this the right seal?? 20180911
water/oil pump. Is this the right seal?? 20180912


__________________________________________________
1988 K100 LT
1984 K100 RS

Instagram K100 Build follow me at: @kustom_moto
    

nobbylon

nobbylon
Silver member
Silver member
No idea, but if you look at the schematic which is on the rebuild page on this forums portal then that’s how it fits. I’ve done 3 so far as per the instructions and they’ve never leaked. It’s possible that if reversed it will not seat home fully and is why the seal popped out. Make sure you grease the shaft lightly before pushing through the seal Paul.


__________________________________________________
R1100GS Feb 1995
K100RS July 1989
R90s June 1975
R75/6 Feb 1976
F650GD May 2001
    

Rick G

Rick G
admin
admin
The raised centre on the seal will face you as you push it in. You are putting it on the shaft the wrong way round.
That seal also looks like a ceramic seal (put up a picture of it side on) which will NOT suit the cast impeller, you need the pressed steel impeller and spacer.


__________________________________________________
"Man sacrifices his health in order to make money.
Then he sacrifices money to recuperate his health.
And then he is so anxious about the future that he does not enjoy the present; the result being that he does not live in the present or the future; he lives as if he is never going to die, and then dies having never really lived."   Dalai Lama


Bikes 1999 K1100 LT with a Big Block 1200
    

@kustom_moto

@kustom_moto
Silver member
Silver member
Thanks guys. Basically I had it the correct way around (as you describe above) on my 1st attempt but the seal popped off leading me to assume I had it the wrong way around but obviously not. I think where I had greased the outer edge of the seal and the fact I probably did not take entering the shaft into the seal quite as carefully as I should of done led it to pop out. This time I will not grease the seal before inserting.

Let this be a warning to others to take it extremely carefully! New seals ariving tomorrow at great expense!

I do have the pressed impeller and spacer....

Thanks again 

Paul


__________________________________________________
1988 K100 LT
1984 K100 RS

Instagram K100 Build follow me at: @kustom_moto
    

Crazy Frog

Crazy Frog
admin
admin
A nice tutorial on the kforum-tech.com where a lot of documents are posted
http://www.kforum-tech.com/mechanical/oil-pump/oil-pump-seals-replacement.htm


__________________________________________________
water/oil pump. Is this the right seal?? Frog15water/oil pump. Is this the right seal?? Logo2101986 k75, 1985 K100rt, 1985 K100rt/EML GT2 sidecar, 1999 K1200lt/Hannigan Astro Sport sidecar.
    

@kustom_moto

@kustom_moto
Silver member
Silver member
Guys this pump is testing me! Finally the seals are in BUT the main gear is an absolute fraction not sitting flush with the mating surface on the pump body. The shaft is torqued down to 33Nm so there is no scope to draw it in further. This can only mean one thing, I have been too keen when lightly sanding flat the pump body mating surface. Question is, if I make a paper gasket has this the potential to work and if so will it hold out oil?


__________________________________________________
1988 K100 LT
1984 K100 RS

Instagram K100 Build follow me at: @kustom_moto
    

nobbylon

nobbylon
Silver member
Silver member
Torqueing the nut makes no difference as it doesn’t pull the gear shaft through the seals. It just tightens the impeller to the shaft. Undo the bolt and using some flat washers pull the gear through until it is flush and also spins but with slight drag from the water seal. The face of the gear should be sitting lightly on the pump body face. It in effect floats between the block face and the pump face.


Last edited by nobbylon on Wed Sep 12, 2018 4:23 am; edited 1 time in total


__________________________________________________
R1100GS Feb 1995
K100RS July 1989
R90s June 1975
R75/6 Feb 1976
F650GD May 2001
    

@kustom_moto

@kustom_moto
Silver member
Silver member
If it is not flush will it not spin freely? At the moment it feels like it is binding slightly,  ie it does not spin freely. 


I will do as you say and pull it through more. I just hope I haven't buggered the mating face!


__________________________________________________
1988 K100 LT
1984 K100 RS

Instagram K100 Build follow me at: @kustom_moto
    

38Back to top Go down   water/oil pump. Is this the right seal?? Empty Pump Tue Sep 11, 2018 8:13 pm

caveman

caveman
Life time member
Life time member
Is it not turning freely because the impeller is dragging on housing face?
 I believe that when pulling the shaft through the water pump seal when the oil pump gear comes flush with the housing is when you start to compress the spring in the water pump seal. If you compress the spring to much it will bind or crack the ceramic face of the seal, likewise if not pulled through far enough when you mount the pump to the engine you will force the water pump seal housing to spread apart causing damage to it.


nobbylon

nobbylon
Silver member
Silver member
When pulled through until flush, I just used a straight edge across the pump face, there is a certain amount of drag. This is caused by the seal itself. Draw the gear through only enough to sit flush thereby, as caveman says, not compressing the spring in the seal too much. The gear does not spin freely when fitted correctly.


__________________________________________________
R1100GS Feb 1995
K100RS July 1989
R90s June 1975
R75/6 Feb 1976
F650GD May 2001
    

@kustom_moto

@kustom_moto
Silver member
Silver member
Brilliant, thank you guys, just pulled it through and sitting flush now, used washers instead of the supplied spacer. It was obviously hitting on the spacer thus not coming through quite far enough......


__________________________________________________
1988 K100 LT
1984 K100 RS

Instagram K100 Build follow me at: @kustom_moto
    

nobbylon

nobbylon
Silver member
Silver member
Big thumb
After numerous attempts at getting the pump to seal against the block I settled on Permatex ultra blue or black RTV silicone sealer. Forget all the other c@@p out there. Bead it on, mate the pump and tighten until it starts to sqeeze from the joint and leave for 10-15 mins. After that tighten up and leave overnight. I’ve not had a leak since.


__________________________________________________
R1100GS Feb 1995
K100RS July 1989
R90s June 1975
R75/6 Feb 1976
F650GD May 2001
    

@kustom_moto

@kustom_moto
Silver member
Silver member
Excellent, I have Permatex Black on the shelf. So, bead onto the pump, what size bead roughly? Also, would you know the torque settings off the top of your head for the bolts holding it on? Or should I not torque but do by feel?


__________________________________________________
1988 K100 LT
1984 K100 RS

Instagram K100 Build follow me at: @kustom_moto
    

nobbylon

nobbylon
Silver member
Silver member
About 4 mm, finger spread so it covers but toward outside so it doesn’t squeeze into motor when bolted up. I don’t torque these as too easy to over do. X sequence tighten until they stop then a little more is more than enough.


__________________________________________________
R1100GS Feb 1995
K100RS July 1989
R90s June 1975
R75/6 Feb 1976
F650GD May 2001
    

@kustom_moto

@kustom_moto
Silver member
Silver member
Excellent...good advice guys, will get this on tonight.
Thanks again


__________________________________________________
1988 K100 LT
1984 K100 RS

Instagram K100 Build follow me at: @kustom_moto
    

Sponsored content


View previous topic View next topic Back to top  Message [Page 1 of 1]

Permissions in this forum:
You cannot reply to topics in this forum