BMW K bikes (Bricks)


You are not connected. Please login or register

View previous topic View next topic Go down  Message [Page 1 of 1]


1Back to top Go down   starting my K100 build Empty starting my K100 build Thu Oct 12, 2017 11:30 pm

haligen

haligen
active member
active member
Got most everything blown apart, sorted out the wiring harness, and am now working on building a new electronics tray. The previous owner just hacked the rear frame off for a cafe seat. I've ordered a proper hoop and will start working on a seat pan when it comes in. Here's a few pics of the electronics.

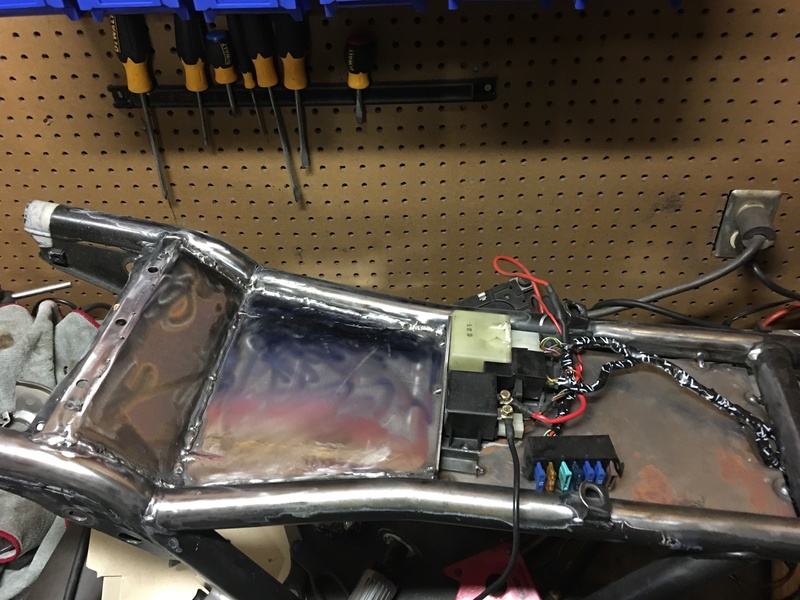
starting my K100 build Img_2913
starting my K100 build Img_2912
starting my K100 build Img_1811


2Back to top Go down   starting my K100 build Empty Re: starting my K100 build Fri Oct 13, 2017 11:18 am

charlie99

charlie99
VIP
VIP
a box around the electronics stuff is always a good plan ...just stops so much crap getting in there

looking good so far


__________________________________________________
cheezy grin whilst riding, kinda bloke ....oh the joy !!!! ...... ( brick aviator )

'86 K100 RT..#0090401 ..."Gerty" ( Gertrude Von Clickandshift ) --------O%O
'86 k100 rs.. #######..  "Fred " (f(rame) red ) ( Fredrick leichtundschnell ) - -
bits and pieces from many kind friends across the k100 world ...with many thanks ..
1987 k100rs ########   "Red"  - (red sports rs TWB style )
1989 K100rt #009637   "Black Betty"  (naked rt ala Nigel , now sporting an rs main fairing )
    

3Back to top Go down   starting my K100 build Empty Re: starting my K100 build Fri Oct 13, 2017 1:25 pm

duck

duck
Life time member
Life time member
While you're at it I'd recommend trying to get the airflow from the back of the radiator to escape without baking the bottom of the gas tank and the rider's thighs.


__________________________________________________
Current stable:
86 Custom K100 (standard fairing, K75 Belly pan, Ceramic chromed engine covers, paralever)
K75 Frankenbrick (Paralever, K11 front end, hybrid ABS, K1100RS fairing, radial tires)
86 K75C Turbo w/ paralever
94 K1100RS
93 K1100LT
91 K1
93 K75S (K11 front end)
91 K75S (K1 front end)
14 Yamaha WR250R
98 Taxi Cab K1200RS
14 K1600GT
http://www.ClassicKBikes.com
    

4Back to top Go down   starting my K100 build Empty Re: starting my K100 build Fri Oct 13, 2017 3:32 pm

haligen

haligen
active member
active member
duck wrote:While you're at it I'd recommend trying to get the airflow from the back of the radiator to escape without baking the bottom of the gas tank and the rider's thighs.
I plan on nixing the air box in favor of an open element type filter. That should open up the underside for some more air flow, but I'm open to any and all suggestions. I could possibly sheet between the frame tubes right under the tank. I've never even ridden a K so I'm kind of basing off other builds or flying blind.  affraid lol!


5Back to top Go down   starting my K100 build Empty Re: starting my K100 build Fri Oct 13, 2017 6:07 pm

duck

duck
Life time member
Life time member
You can get rid of the airbox but you'll still need the silver box that is the mass airflow sensor.


__________________________________________________
Current stable:
86 Custom K100 (standard fairing, K75 Belly pan, Ceramic chromed engine covers, paralever)
K75 Frankenbrick (Paralever, K11 front end, hybrid ABS, K1100RS fairing, radial tires)
86 K75C Turbo w/ paralever
94 K1100RS
93 K1100LT
91 K1
93 K75S (K11 front end)
91 K75S (K1 front end)
14 Yamaha WR250R
98 Taxi Cab K1200RS
14 K1600GT
http://www.ClassicKBikes.com
    

6Back to top Go down   starting my K100 build Empty Re: starting my K100 build Sat Oct 14, 2017 12:33 am

haligen

haligen
active member
active member
I've seen a few adapters made. I might pick one up or machine one. I wonder if the big plastic box above the throttle bodies could be replaced with a tube type manifold.


7Back to top Go down   starting my K100 build Empty Re: starting my K100 build Tue Oct 17, 2017 2:30 am

haligen

haligen
active member
active member
Got some more work done. Seat hoop welded on, and started modifying the factory collector.

starting my K100 build Img_7313
starting my K100 build Img_8413
starting my K100 build Img_3113
starting my K100 build Img_1213
starting my K100 build Img_5513

And just to get an idea on muffler positioning I used a piece of 2" pipe.
starting my K100 build Img_1613
starting my K100 build 28


Sponsored content


View previous topic View next topic Back to top  Message [Page 1 of 1]

Permissions in this forum:
You cannot reply to topics in this forum